Vinyasa Yoga Flow Sequences for Beginners
A vinyasa yoga flow sequence is a series of yoga poses linked together by breath — each inhale and exhale […]
 FrankLin
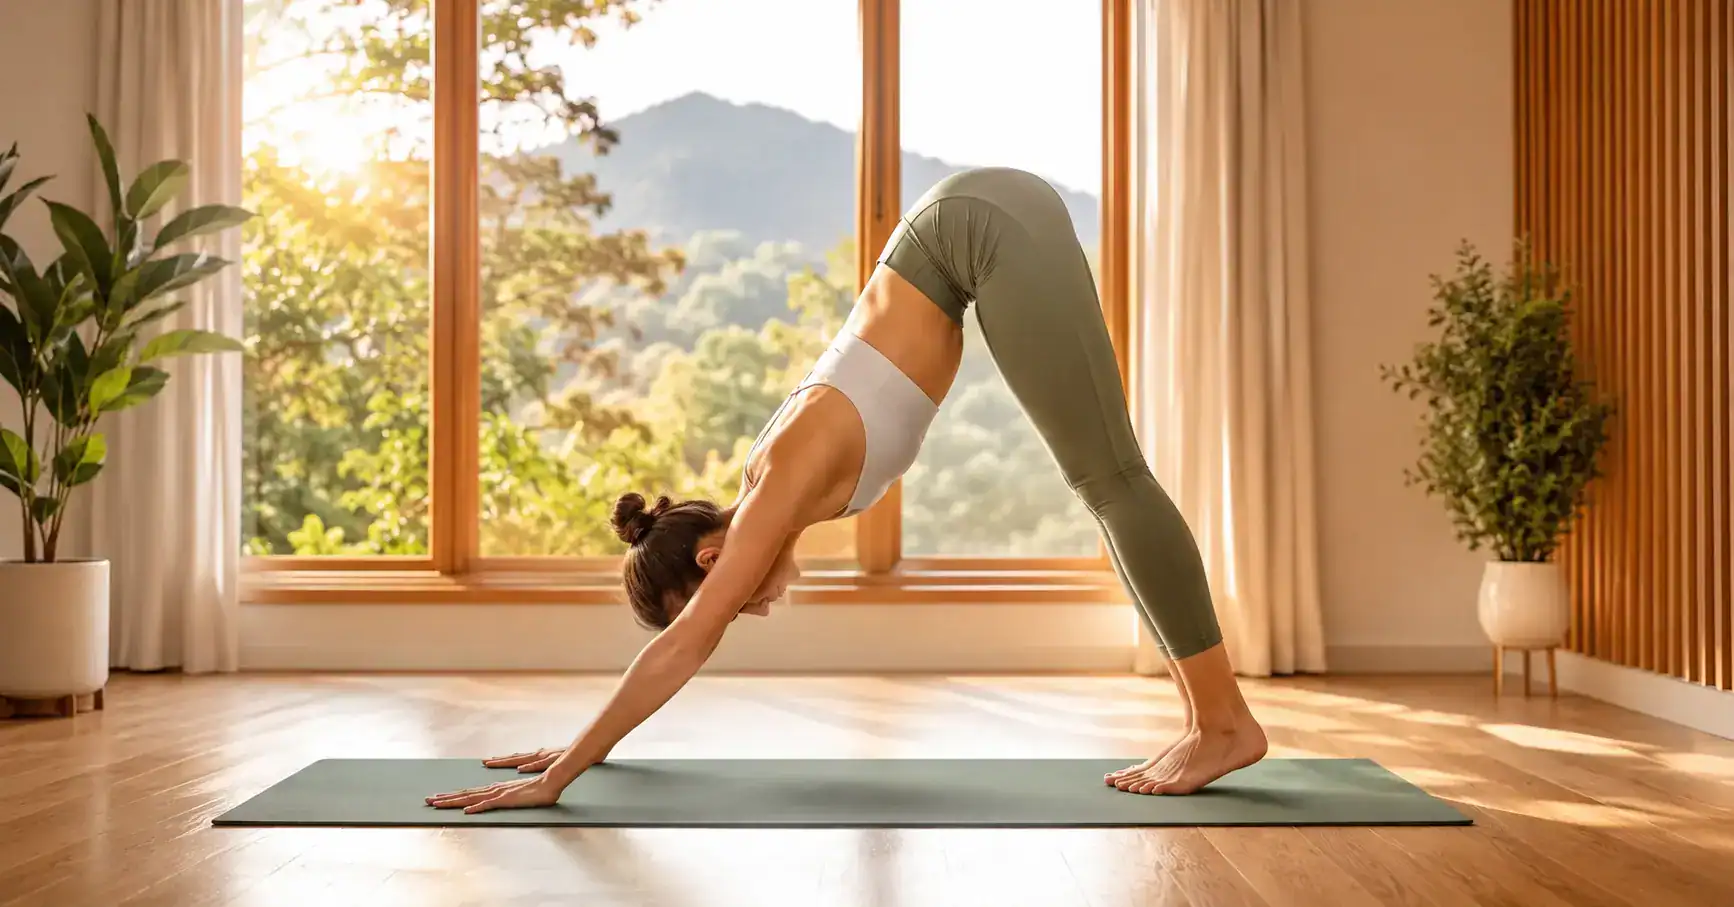
A vinyasa yoga flow sequence is a series of yoga poses linked together by breath — each inhale and exhale moves you from one pose to the next in a continuous, flowing pattern. For beginners, a good vinyasa sequence starts with simple standing and floor poses, uses clear transitions, and lasts 20–40 minutes. The most important rule: every movement is led by breath. Inhale to expand, exhale to contract or fold.
Most people think yoga means holding still poses for long stretches of time.
Vinyasa yoga is something different — and for many beginners, it is something far more engaging. In a vinyasa flow, you move. You breathe. You transition from pose to pose in a continuous, rhythm-driven sequence that feels less like a workout and more like a moving meditation.
The word vinyasa comes from Sanskrit — vi meaning “in a special way” and nyasa meaning “to place.” Literally: to place movement in a special way. And that is exactly what vinyasa yoga does. It places each movement in precise relationship with breath, creating a practice that is both physically challenging and deeply calming at the same time.
If you are a beginner wondering whether vinyasa yoga is too advanced for you — the answer is no. With the right sequence, the right modifications, and a clear understanding of the foundational transitions, vinyasa yoga is completely accessible from your very first session.
This guide gives you everything you need: what vinyasa yoga is, how it differs from other styles, the key poses and transitions you need to know, and three complete beginner vinyasa sequences you can practice today — right from your own home.
What Is Vinyasa Yoga?
Vinyasa yoga is a dynamic, breath-centered style of yoga in which poses are linked together in a flowing sequence — each movement synchronized with either an inhale or an exhale.
Unlike Hatha yoga, where poses are held individually for several breaths before transitioning, vinyasa keeps you moving continuously. The breath is the thread that connects every pose. You never move without breathing, and you never breathe without it directing your movement.
This synchronization of breath and movement is called vinyasa krama — the science of sequencing. When done well, a vinyasa sequence has a rhythm and intelligence to it: warming up, building to a peak pose, then cooling down and restoring — all in a single continuous flow.
Vinyasa vs. Hatha vs. Ashtanga: Key Differences
| Pace | Dynamic, flowing | Slow, static | Fast, set sequence |
| Poses | Creative, varied | Individual, held | Fixed sequence always |
| Breath | Every movement linked | Breath held in poses | Set breathing pattern |
| Heat | Moderate to high | Low to moderate | Very high |
| Beginner-friendly | Yes (with modifications) | Yes | Less so |
| Sequence | Changes each class | Changes each class | Same every time |
| Best for | Flow and mindfulness | Alignment and stillness | Discipline and strength |
Why Vinyasa Is Excellent for Beginners
Many beginners actually find vinyasa easier to sustain than static yoga because the continuous movement keeps the mind engaged. There is less time to overthink a pose, less awareness of discomfort, and a greater sense of momentum and progress.
The flowing nature also means your body warms up progressively — which makes transitions into deeper poses feel more accessible and safer.
The Most Important Concept in Vinyasa: Breath Leads Movement
Before learning a single vinyasa sequence, internalize this one rule:
The breath always leads. The body follows.
In vinyasa yoga:
Inhale = expansive movements (rising, opening, lifting, extending) Exhale = contracting movements (folding, lowering, twisting, grounding)You never move on a held breath. If you find yourself holding your breath in a pose or transition, that is a signal — ease back, simplify the movement, and return to breathing first.
The Ujjayi Breath — Vinyasa’s Foundation
Almost all vinyasa yoga uses Ujjayi pranayama (the Victorious Breath) as the primary breathing technique.
How to practice Ujjayi:
Breathe in through your nose Breathe out through your nose with a slight constriction at the back of the throat The result is a soft, ocean-like sound — audible to you but not to others in the room Each breath should be slow, deep, and controlledUjjayi breath does three things that are essential to vinyasa practice:
Generates internal heat that warms the muscles from the inside out Anchors the mind to the present moment — the sound of the breath becomes a moving meditation Regulates the pace of your flow — each movement takes exactly one breath, preventing rushingPractice Ujjayi breath for 2–3 minutes before your first vinyasa sequence. Once it feels natural, keep it throughout your practice.
8 Essential Poses Every Beginner Needs for Vinyasa Flow
Before attempting a full vinyasa sequence, become comfortable with these eight foundational poses. They appear in almost every beginner vinyasa flow.
1. Mountain Pose (Tadasana)
The starting position for all standing vinyasa sequences. Stand tall, feet together or hip-width apart, spine long, shoulders relaxed, arms by sides. Breathe deeply.
Vinyasa role: Starting point and reset pose between standing sequences.
2. Forward Fold (Uttanasana)
From standing, hinge at hips and fold forward. Hands to shins, ankles, or floor. Knees can be generously bent. Let the head hang heavy.
Vinyasa role: Transition between standing poses and floor-based sequences. Always on an exhale.
3. Half Lift / Flat Back (Ardha Uttanasana)
From Forward Fold, inhale and lift your chest halfway — spine parallel to the floor, hands on shins. Back is flat, not rounded.
Vinyasa role: Critical transition pose. Appears in nearly every Sun Salutation and vinyasa sequence. Always on an inhale.
4. Plank Pose (Phalakasana)
Hands under shoulders, body in one straight line from head to heels. Core engaged. Don’t let hips sag or lift. This is yoga’s push-up position.
Vinyasa role: Core transition pose between standing sequences and floor poses. Builds the arm and core strength needed for deeper vinyasa.
Beginner tip: Drop to your knees (Half Plank) whenever needed. This is not a modification — it is a smart choice.
5. Low Plank / Chaturanga Dandasana
From Plank, shift forward onto your toes and lower your body halfway — elbows bent at 90°, body still in one line. Elbows track back (not out to the sides).
Vinyasa role: The most challenging beginner transition. Builds significant upper body and core strength. Take your time with this one.
Beginner modification: Drop both knees to the mat first, then lower your chest. This is called “knees-chest-chin” and is a fully valid beginner alternative for months.
6. Upward Facing Dog (Urdhva Mukha Svanasana)
From Low Plank, press through your hands, straighten your arms, lift your chest and thighs off the mat. Only hands and tops of feet touch the floor.
Vinyasa role: Follows Chaturanga in the classic vinyasa transition. Opens the chest and strengthens the spine.
Beginner modification: Cobra Pose (Bhujangasana) — elbows bent, thighs on the mat. Nearly identical benefits with significantly less strain.
7. Downward Facing Dog (Adho Mukha Svanasana)
From Upward Dog, tuck your toes, lift your hips up and back into an inverted V. Spine long, heels pressing toward the floor (knees can be bent).
Vinyasa role: The central resting pose of vinyasa yoga. You return here between sequences to breathe, reset, and prepare for what comes next.
Hold: 3–5 breaths every time you arrive in Downward Dog.
8. Child’s Pose (Balasana)
From Downward Dog or any kneeling position — sit hips back toward heels, extend arms forward, forehead to mat. Breathe into your back.
Vinyasa role: Your universal rest pose. Take it anytime — without asking permission and without feeling like you’ve failed. This is part of the practice.
The Classic Vinyasa Transition (The “Vinyasa”)
In vinyasa yoga, the word “vinyasa” also refers to a specific 4-pose transition sequence used to link the two sides of a pose or to move between standing sequences. You will hear teachers say “take a vinyasa” — this is what they mean:
Plank → Chaturanga (Low Plank) → Upward Dog (or Cobra) → Downward Dog
This transition appears dozens of times in a single class. Learning it well — and knowing when to modify it — is the single most important skill in beginner vinyasa yoga.
Beginner Version of the Vinyasa Transition:
| 1 | Plank Pose | Exhale | Half Plank (knees down) |
| 2 | Lower to mat | Exhale continues | Knees-Chest-Chin |
| 3 | Cobra Pose | Inhale | Keep elbows bent |
| 4 | Downward Dog | Exhale | Bend knees generously |
Practice this transition 5–10 times before attempting a full sequence. It should feel smooth and breath-connected before you add more poses around it.
3 Complete Beginner Vinyasa Yoga Flow Sequences
Sequence 1 — The Foundation Flow (20 Minutes)
Best for: Absolute beginners in their first 2–4 weeks of vinyasa yoga Focus: Learning the breath-movement connection and the basic vinyasa transition Intensity: Low
Warm-Up (5 minutes)
1. Child’s Pose — 10 breaths Start here. Set your intention. Breathe into your back body. Let the day fall away.
2. Cat-Cow — 10 breath cycles From tabletop — Cow on inhale (belly drops, chest lifts), Cat on exhale (spine rounds, chin tucks). Move slowly and deliberately. This is where you find your Ujjayi breath.
3. Thread the Needle — 5 breaths each side From tabletop, slide right arm under left, rest right shoulder and cheek on mat. Release upper back tension.
Standing Sequence (8 minutes)
4. Mountain Pose — 5 breaths Stand tall at the top of your mat. Breathe. Feel the ground beneath you.
5. Inhale — arms sweep up (Urdhva Hastasana) Reach both arms overhead, palms touching or facing each other.
6. Exhale — Forward Fold (Uttanasana) Hinge at hips, fold forward, hands to shins or floor, knees bent.
7. Inhale — Half Lift (Ardha Uttanasana) Lengthen spine, chest forward, hands on shins.
8. Exhale — Step back to Plank Step or jump both feet back. Hold Plank for one breath.
9. Exhale — Lower through Chaturanga (or Knees-Chest-Chin) Lower with control. Keep elbows close to ribs.
10. Inhale — Cobra or Upward Dog Open your chest. Shoulders back and down.
11. Exhale — Downward Dog Press back. Hold for 5 breaths.
12. Inhale — Step right foot forward between hands Right foot comes to the top of the mat.
13. Warrior Pose 1 — 5 breaths Back foot at 45°, hips square forward, arms overhead.
14. Exhale — Forward Fold Step back foot forward to meet front foot. Fold.
15. Repeat steps 5–14 on the LEFT side
Cool-Down (7 minutes)
16. Seated Forward Fold — 10 breaths Legs extended, hinge from hips, reach for feet or use strap.
17. Supine Twist — 8 breaths each side Lie on back, draw right knee to chest, guide it across to the left, gaze right.
18. Legs Up the Wall or Reclined Butterfly — 3 minutes Full rest. Let gravity work.
19. Savasana — 5 minutes Non-negotiable. Eyes closed. Body completely released.
Sequence 2 — The Sun Salutation Flow (30 Minutes)
Best for: Beginners who have practiced Sequence 1 for 2+ weeks Focus: Building the full Sun Salutation A and B with warrior poses Intensity: Low–Moderate
What Is a Sun Salutation?
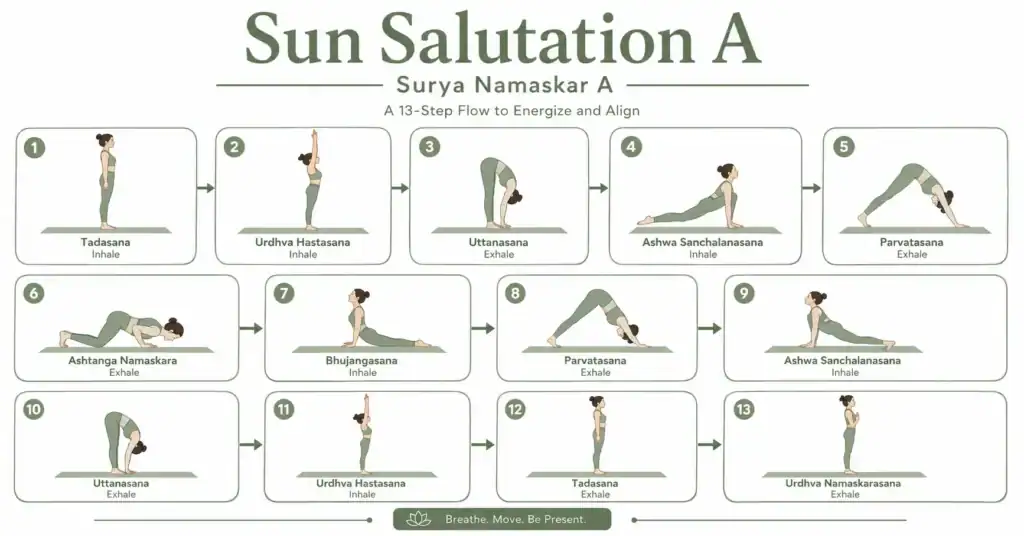
A Sun Salutation (Surya Namaskar) is the foundational vinyasa sequence in most yoga traditions. It is a complete mini-flow on its own — warming the entire body, linking breath to movement, and building heat progressively.
Sun Salutation A — Step by Step:
| 1 | Mountain Pose | Inhale — stand tall |
| 2 | Arms sweep up | Inhale — reach overhead |
| 3 | Forward Fold | Exhale — fold down |
| 4 | Half Lift | Inhale — lengthen spine |
| 5 | Step back to Plank | Exhale — step or jump back |
| 6 | Chaturanga / Lower down | Exhale — lower with control |
| 7 | Cobra or Upward Dog | Inhale — open chest |
| 8 | Downward Dog | Exhale — press back, hold 5 breaths |
| 9 | Walk or jump feet forward | Inhale — step to top of mat |
| 10 | Half Lift | Inhale — lengthen |
| 11 | Forward Fold | Exhale — fold |
| 12 | Rise to standing, arms up | Inhale — sweep up |
| 13 | Return to Mountain Pose | Exhale — hands to heart |
This is one round of Sun Salutation A.
The 30-Minute Sequence:
Warm-Up (5 min): Child’s Pose (10 breaths) → Cat-Cow (10 cycles) → Downward Dog (8 breaths)
Sun Salutation A × 3 rounds (10 min) First round: very slow — learn each step. Second round: moderate pace. Third round: find your flow.
Sun Salutation B with Warriors (10 min): Sun Salutation B adds Warrior Pose 1 into the flow. After stepping the right foot forward from Downward Dog, rise into Warrior 1. Hold 3 breaths. Step back to Plank → vinyasa → Downward Dog → step left foot forward → Warrior 1 left side. Hold 3 breaths. Complete the salutation back to Mountain Pose.
Repeat Sun Salutation B × 2 rounds each side.
Cool-Down (5 min): Seated Forward Fold → Supine Twist → Savasana
Sequence 3 — The Full Beginner Flow (45 Minutes)
Best for: Beginners who have practiced consistently for 4–6 weeks Focus: Building a complete, well-rounded vinyasa practice with standing, balancing, and floor poses Intensity: Moderate
Warm-Up (8 minutes)
Child’s Pose — 10 breaths Cat-Cow — 10 cycles Thread the Needle — 5 breaths each side Downward Dog — 8 breaths Three-Legged Dog (right leg lifts) — 3 breaths, then step forwardStanding Sequence — Right Side (10 minutes)
From Downward Dog, step right foot forward:
Low Lunge (Anjaneyasana) — 5 breaths Warrior Pose 1 — 5 breaths (rise up, arms overhead) Warrior Pose 2 — 5 breaths (open arms to T-shape, hips open sideways) Reverse Warrior — 3 breaths (back arm slides down back leg, front arm rises) Triangle Pose (Trikonasana) — 5 breaths (straighten front leg, reach forward and down) Vinyasa transition (Plank → Chaturanga → Cobra → Down Dog)Standing Sequence — Left Side (10 minutes)
Step left foot forward and repeat steps 5–10 on the left side.
Balance Sequence (5 minutes)
From Mountain Pose:
Tree Pose (Vrksasana) — 5 breaths each side Warrior Pose 3 (prep) — Hinge forward, lift one leg behind, hold hands at heart — 3 breaths each sideFloor Sequence (7 minutes)
Come to seated:
Boat Pose (Navasana) — 3 × 5 breaths (knees bent option) Bridge Pose — 5 breaths × 2 rounds Seated Forward Fold — 10 breaths Supine Twist — 8 breaths each sideClosing (5 minutes)
Happy Baby Pose (Ananda Balasana) — 8 breaths (hold outer feet, knees toward armpits) Savasana — 5–7 minutes minimumCommon Mistakes Beginners Make in Vinyasa Yoga
❌ Moving faster than the breath
Vinyasa is not a race. If your breath is choppy, shallow, or absent — slow down. The breath sets the pace. Always.
❌ Skipping Child’s Pose
Many beginners feel they “should” keep up with the flow. This creates tension and injury. Child’s Pose is not giving up — it is a fundamental part of the practice. Take it freely.
❌ Forcing Chaturanga before the body is ready
Chaturanga requires significant shoulder, tricep, and core strength. Forcing it before you have that strength causes rotator cuff injuries. Use Knees-Chest-Chin for your first 4–8 weeks of practice without guilt.
❌ Holding the breath during transitions
Transitions are where beginners most often hold their breath. Practice stepping back to Plank slowly while exhaling — make the exhale last the entire transition.
❌ Skipping Savasana
Every vinyasa session must end in Savasana. This is when the nervous system integrates the practice. Without it, you get the workout but miss the yoga.
❌ Practicing on an empty stomach (or too full)
Vinyasa generates heat and involves core engagement. Practice on a light stomach — 2–3 hours after a full meal, or 30–60 minutes after a light snack.
How to Build a Beginner Vinyasa Practice Over 8 Weeks
| 1–2 | Sequence 1 (Foundation) | 3 | Learn breath + basic vinyasa transition |
| 3–4 | Sequence 1 + Sun Salutation A practice | 3–4 | Build Sun Salutation A fluency |
| 5–6 | Sequence 2 (Sun Salutation Flow) | 4 | Add Warriors into the flow |
| 7–8 | Sequence 3 (Full Beginner Flow) | 4–5 | Build complete practice stamina |
After 8 weeks of this progression, you will have the foundation to join any beginner or mixed-level vinyasa class with confidence.
What to Expect in Your First Month of Vinyasa Yoga
Week 1: Poses feel unfamiliar. Transitions feel choppy. The breath-movement link feels forced. This is completely normal — your nervous system is learning a new pattern. Be patient.
Week 2: Ujjayi breath starts to feel more natural. You begin to remember which poses come next. Chaturanga modifications feel strong rather than limiting.
Week 3: Transitions begin to flow. You notice your breath genuinely leading movement rather than following it. Energy levels improve. Sleep quality often improves noticeably.
Week 4: A complete Sun Salutation feels fluid. You can hold Warrior poses longer. The practice begins to feel like yours — not like something you’re copying.
Tips for Practicing Vinyasa Yoga at Home
Set a dedicated space. Even a single mat-sized area kept clear for your practice creates a psychological signal to the brain — this space is for yoga. This increases consistency significantly.
Practice at the same time daily. Morning vinyasa builds energy and sets a focused tone for the day. Evening vinyasa releases tension and prepares for sleep. Both are excellent — choose one and stick with it.
Use a timer, not a clock. Set a timer for your session length and don’t look at the clock. Constant time-checking interrupts the flow state that vinyasa is designed to create.
Record yourself once a month. You don’t need a teacher watching to improve your alignment. Filming yourself once a month reveals patterns — head position, knee tracking, breath timing — that you cannot feel from the inside.
Follow along before flowing solo. In your first month, use a video or audio guide to follow a class. This trains your ear to respond to cues. After 4–6 weeks, try practicing from memory — this deepens embodiment and internal awareness.
Vinyasa Yoga Benefits: What the Research Says
Vinyasa yoga is not just a physical workout. Research consistently shows that dynamic, breath-centered yoga practices deliver measurable results across multiple dimensions of health:
Physical benefits:
Improved cardiovascular fitness — vinyasa elevates heart rate into a light aerobic zone during peak sequences Increased muscular strength — particularly in the core, arms, and legs Enhanced flexibility — especially in the hamstrings, hips, and spine Improved balance and proprioceptionMental and emotional benefits:
Significant reduction in perceived stress and cortisol levels Improved mood and reduced symptoms of mild to moderate anxiety and depression Enhanced focus and concentration — the breath-movement synchronization trains sustained attention Better sleep qualityStudies published on platforms including the National Center for Biotechnology Information confirm that regular yoga practice — including dynamic vinyasa styles — activates the parasympathetic nervous system, reduces inflammatory markers, and supports both physical and mental wellbeing. (Read the research)
Vinyasa Yoga Equipment: What You Actually Need
You need very little to start vinyasa yoga. Here is an honest list:
Essential:
Non-slip yoga mat — the single most important purchase. A mat with good grip prevents sliding in dynamic transitions. Look for 4–6mm thickness for joint comfort.Highly Recommended:
2 yoga blocks — used in standing poses, forward folds, and balance poses to bring the floor closer when flexibility is limited 1 yoga strap — for Seated Forward Fold and any pose where your hands cannot reach your feetOptional but Useful:
Yoga bolster — for restorative closing poses Non-slip mat towel — if you sweat heavily during flowNot Needed:
Yoga pants (any comfortable, stretchy clothing works) Yoga socks (barefoot is always better for grip and proprioception) A gym membership or studio subscription (these three sequences are complete home practices)Conclusion
Vinyasa yoga will meet you exactly where you are.
You don’t need to be strong, flexible, or experienced. You need a mat, a willingness to breathe, and the patience to move slowly enough that the breath can actually lead.
In your first week, the sequences in this guide will feel unfamiliar. In your second week, they will start to feel possible. By your fourth week, they will begin to feel like yours. That is the arc of every vinyasa practice — from effort to ease, from thinking to flowing, from following instructions to moving from the inside out.
The breath is already there. It has been with you your entire life. Vinyasa yoga simply teaches you to listen to it — and to let it carry you.
Roll out your mat. Take one Ujjayi breath. Begin.
Start your vinyasa journey today — visit TheShivYoga.com for guided beginner classes, weekly flow sequences, and a community that practices together.
Disclaimer: This article is for informational purposes only and does not constitute medical advice. Always consult a qualified healthcare provider before beginning any new exercise or yoga program, particularly if you have pre-existing health conditions or injuries. If you experience pain during any pose or transition, stop immediately and rest.
FAQ Section
Q1: Can a complete beginner do vinyasa yoga?
Yes. Vinyasa yoga is fully accessible to complete beginners with the right approach. Start with Sequence 1 in this guide, use all modifications freely (especially Knees-Chest-Chin instead of Chaturanga), and focus on learning the breath-movement connection before worrying about pose depth. Most beginners feel comfortable in a basic vinyasa flow within 2–3 weeks of consistent practice.
Q2: How long should a beginner vinyasa yoga session be?
Beginners should start with 20–30 minute sessions (Sequence 1 in this guide). This is enough to build the foundational breath-movement patterns without overwhelming the body. After 3–4 weeks, extend to 30–45 minutes. A 45–60 minute session becomes accessible and sustainable after 6–8 weeks of regular practice.
Q3: What is the difference between vinyasa yoga and hatha yoga for beginners?
Hatha yoga holds individual poses for several breaths before transitioning — giving beginners more time to understand alignment and find stability. Vinyasa links poses together with breath in a continuous flow — keeping the mind engaged and building heat progressively. Beginners who prefer stillness and detailed alignment start with hatha. Beginners who prefer movement and rhythm often find vinyasa more sustainable and enjoyable.
Q4: How many times a week should a beginner practice vinyasa yoga?
Start with 3 sessions per week for your first month — this allows the body to adapt and recover between sessions. In months 2–3, increase to 4–5 sessions per week as strength and stamina build. Daily vinyasa practice (60 minutes) is appropriate for intermediate practitioners after 3–6 months of consistent foundation building.
Q5: Do I need to know Sun Salutations before starting vinyasa yoga?
You do not need to know Sun Salutations before your first vinyasa session, but learning them early (weeks 3–4) will dramatically accelerate your progress. Sun Salutations are the foundational sequence of vinyasa yoga — they teach the breath-movement link, the vinyasa transition, and the rhythm of flow practice more efficiently than any other single exercise. Sequence 2 in this guide teaches Sun Salutation A step by step.