Ardha Padmasana (Half Lotus Pose): Steps, Benefits, and Complete Practice Guide
⚡ Quick Answer BoxArdha Padmasana — meaning “Half Lotus Pose” in Sanskrit — is a seated yoga posture in which […]
 BigThink
⚡ Quick Answer Box
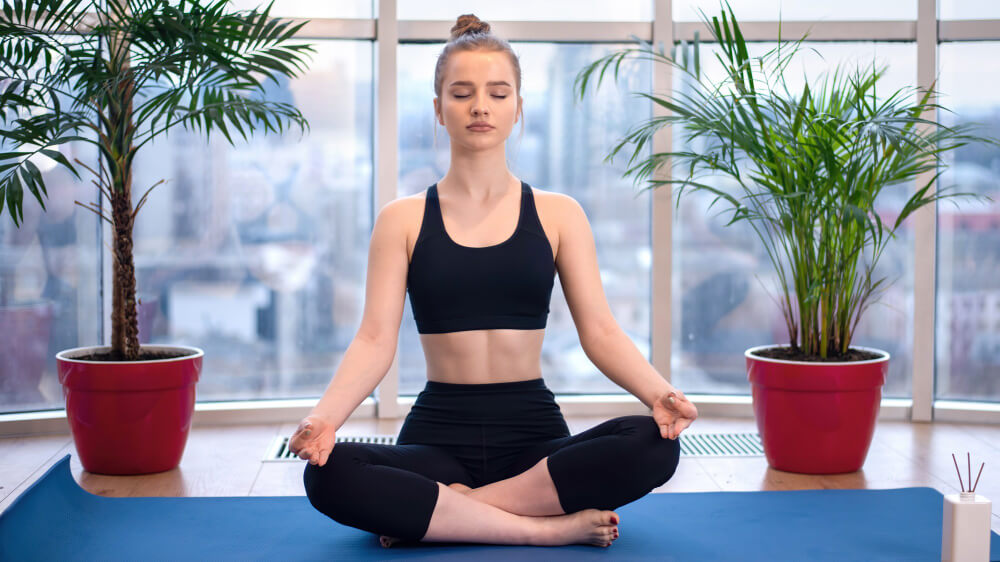
Ardha Padmasana — meaning “Half Lotus Pose” in Sanskrit — is a seated yoga posture in which one foot is placed on the opposite thigh while the other foot rests beneath the opposite knee on the floor. It is the foundational preparation for full Lotus Pose (Padmasana), combining deep hip external rotation with a stable, grounded seated base. Ardha Padmasana is widely used for meditation, pranayama, and breath work — and is accessible to most beginners with consistent hip-opening preparation.
There is a reason the lotus flower appears at the center of yoga’s most sacred imagery. Rising from muddy water into pristine bloom, it represents the journey from unconsciousness to awakening — from distraction to presence.
Ardha Padmasana — the Half Lotus Pose — is the yoga practitioner’s first step toward that symbol. It is the pose that bridges the gap between simple cross-legged sitting and the full Lotus Pose (Padmasana) that experienced meditators hold for hours. And for millions of practitioners worldwide, it is the most comfortable and sustainable seated meditation posture available.
Whether you are new to yoga and looking for a stable sitting position for meditation, an intermediate practitioner working toward full Padmasana, or someone exploring the philosophy and anatomy of seated yoga poses — this guide gives you everything. The Sanskrit meaning and mythology, the precise anatomy, step-by-step instructions, modifications, benefits, contraindications, preparatory poses, and the complete practice framework for making Ardha Padmasana a sustainable part of your yoga and meditation life.
What Is Ardha Padmasana? Sanskrit Meaning and Origins
Ardha Padmasana (अर्ध पद्मासन) is composed of three Sanskrit words:
| Ardha (अर्ध) | Half |
| Padma (पद्म) | Lotus flower |
| Asana (आसन) | Seat / Posture |
Together: “Half Lotus Seat” — a seated posture that replicates one half of the full Lotus flower shape.
The Lotus in Yoga Philosophy
The lotus (Padma) is one of the most sacred symbols in Hindu, Buddhist, and Jain traditions — all of which have deeply influenced the yoga system. In yogic philosophy, the lotus represents:
Spiritual unfolding — the lotus blooms upward from the mud, as consciousness evolves from ignorance toward enlightenment Non-attachment — the lotus floats on water without being submerged, as the yogi moves through life without being overwhelmed by it Chakra activation — each of the seven chakras is described as a lotus flower with a specific number of petals. The Crown Chakra (Sahasrara) — the chakra of pure consciousness — is depicted as a thousand-petaled lotus in full bloomSitting in Ardha Padmasana is not merely a physical choice — it is an act of aligning the body with the symbolic and energetic language of the yoga tradition.
Historical Context
Ardha Padmasana appears in the Hatha Yoga Pradipika — one of the most important classical texts of Hatha yoga, written in the 15th century by Swami Swatmarama. The text describes seated postures specifically for pranayama and meditation practice, with Padmasana and its variations forming the foundation of all sitting practice.
The pose is also depicted in ancient Hindu iconography — many representations of deities including Shiva, Vishnu, and the Buddha show them seated in Padmasana or Ardha Padmasana, reinforcing the association between this posture and states of deep meditation and spiritual power.(1)
Ardha Padmasana vs. Padmasana: Key Differences
Many practitioners use these terms interchangeably, but they describe distinct postures with important differences.
| Foot position | One foot on opposite thigh, one on floor | Both feet on opposite thighs |
| Hip demand | Moderate external rotation | Full, deep external rotation |
| Knee demand | Moderate | Significant — requires open hips |
| Beginner-friendly | Yes | No — requires preparation |
| Spinal position | Upright, stable | Upright, very stable |
| Meditation use | Excellent | Traditional optimal |
| Risk of injury | Low with correct prep | Higher without proper hip opening |
The key principle: Ardha Padmasana is not a lesser version of Padmasana — it is a complete and valuable practice in its own right. Many experienced meditators prefer it for long sessions because it distributes weight more evenly and creates less knee pressure than the full Lotus.
Anatomy of Ardha Padmasana: What Is Happening in the Body
Understanding the anatomical demands of Ardha Padmasana helps practitioners prepare correctly, avoid injury, and deepen the pose sustainably over time.
Primary Joints and Muscles Involved
Hip Joint (Primary): Ardha Padmasana requires significant external rotation of the hip joint — the femur (thigh bone) rotating outward in the hip socket (acetabulum). This movement is governed primarily by:
Piriformis — deep external hip rotator, often tight in people who sit at desks Obturator externus and internus — deep rotators of the hip joint Gemellus superior and inferior — small deep hip rotators Quadratus femoris — external rotator and hip stabilizer Gluteus maximus — large superficial external rotatorKnee Joint (Secondary): When the foot is placed on the opposite thigh, the knee is placed in a position of flexion with external tibial rotation. This is a vulnerable position for the knee joint — which is why correct preparation (hip flexibility first) is essential. The knee should never be forced in Ardha Padmasana — all rotation must come from the hip.
Ankle Joint: The ankle of the raised foot is held in a dorsiflexed (foot flexed toward shin) position when the foot is placed correctly on the thigh. This protects the knee by distributing the rotational forces more evenly.
Spine: The spine should be neutrally upright — neither arched nor rounded. The sitting bones (ischial tuberosities) provide the base. The lumbar spine maintains its natural curve. The thoracic spine is long and open. The cervical spine is elongated with the chin slightly tucked.
Why Hip Flexibility Comes First
The most critical anatomical principle in Ardha Padmasana is:
All rotation must come from the hip — never from the knee.
The hip joint is a ball-and-socket joint designed for multi-directional movement, including external rotation. The knee is a hinge joint — it flexes and extends but has very limited rotational capacity.
When the hip is not open enough to provide the required external rotation, the body compensates by rotating at the knee — placing the ligaments, cartilage, and menisci of the knee under torsional stress they are not designed to bear.
This is the most common cause of yoga knee injuries — and it is entirely preventable through proper hip-opening preparation before attempting Ardha Padmasana.
Preparatory Poses: How to Open the Hips for Ardha Padmasana
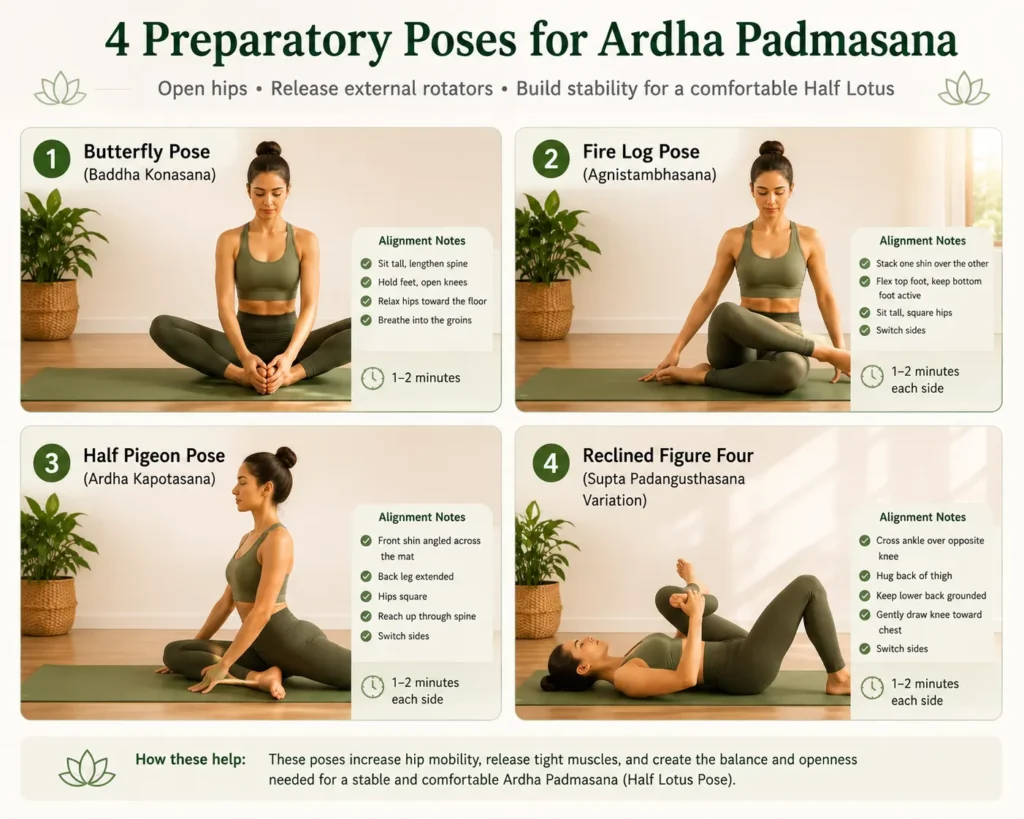
Practice these preparatory poses for 4–8 weeks before attempting Ardha Padmasana if your hips are tight. Even if you can already sit in the pose, these preparations deepen it and protect the knee joint.
Prep 1: Butterfly Pose (Baddha Konasana)
Butterfly Pose is the most direct preparatory pose for Ardha Padmasana — opening the inner thighs, groins, and hip adductors that must release before external rotation is safely achievable.
How to do it:
Sit on your mat with the soles of your feet together and knees falling open Hold your feet or ankles with both hands Sit tall — lengthen your spine on each inhale On each exhale — allow gravity (not muscular force) to drop your knees fractionally lower Hold for 15–20 slow breathsHold: 3–5 minutes daily
Prep 2: Fire Log Pose (Agnistambhasana)
Fire Log Pose creates deep external hip rotation — more directly targeting the piriformis and deep hip rotators than Butterfly Pose, making it the most specific preparatory pose for Ardha Padmasana.
How to do it:
Sit on your mat and stack your right shin on top of your left shin — like two logs Both shins are parallel to the front of the mat, stacked at 90° Flex both feet to protect the knees Sit tall and breathe — then gently hinge forward for a deeper stretch Hold 10 breaths, then switch which shin is on topHold: 10 breaths each side
Prep 3: Reclined Figure Four (Supta Kapotasana)
This supine variation allows the hip external rotators to release passively — without the weight-bearing demands of seated poses — making it ideal for practitioners with tight hips or sensitive knees.
How to do it:
Lie on your back with knees bent, feet flat on the mat Cross your right ankle over your left knee — foot flexed Either stay here OR draw both legs toward your chest (holding behind the left thigh) Breathe into the right outer hip — release with each exhale Hold 10–15 breaths, then switch sidesHold: 10–15 breaths each side
Prep 4: Half Pigeon Pose (Eka Pada Rajakapotasana — Prep)
Half Pigeon creates one of the deepest available stretches for the piriformis and hip external rotators — essential preparation for the half-lotus foot placement.
How to do it:
From Downward Dog, bring your right knee forward and place it behind your right wrist Your right foot comes toward your left wrist — the more parallel your shin is to the front of the mat, the deeper the stretch Lower your left leg back, top of the foot on the mat Square your hips toward the front of the mat Either stay upright (hands on blocks) or lower your torso forward onto a bolster Hold 10–15 breaths, then switch sidesHold: 10–15 breaths each side
Prep 5: Seated Wide-Angle Forward Fold (Upavistha Konasana)
Opens the inner thighs and hamstrings — the secondary muscles that limit hip external rotation when tight.
How to do it:
Sit with legs extended wide — as wide as is comfortable without forcing Inhale and lengthen your spine Exhale and hinge forward from your hips — keeping spine long Walk your hands forward on the mat Hold 15–20 breathsHold: 3–5 minutes
How to Do Ardha Padmasana: Step-by-Step
Once your hips feel sufficiently open from the preparatory poses above, approach Ardha Padmasana with patience and precision. Never force the position.
Step 1: Establish Your Seated Base
Sit on your mat in a simple cross-legged position (Sukhasana). If your lower back rounds in this position, sit on the edge of a folded blanket or firm cushion — this tilts the pelvis slightly forward and allows the spine to be upright naturally.
Feel your two sitting bones (ischial tuberosities) making firm, even contact with the mat or blanket. This is your foundation. Take 5 deep breaths here before proceeding.
Step 2: Extend Both Legs Forward
From your seated base, extend both legs straight in front of you (Staff Pose / Dandasana). Sit tall. This resets the hip position and gives you a neutral starting point.
Step 3: Bend the Right Knee and Place the Right Foot
Bend your right knee and bring the sole of your right foot to rest near your left inner thigh or groin — as in the beginning of a simple cross-legged position.
Step 4: Bend the Left Knee — The Half Lotus Element
This is the defining step of Ardha Padmasana. Bend your left knee and lift your left foot with both hands.
Hold the outer edge of your left foot — not the toes — and gently externally rotate your left hip Slowly guide your left foot upward and onto your right thigh The left foot should rest on the right thigh with the sole of the foot facing upward and the heel pointing toward the lower abdomen The left ankle rests on the right thigh — not in the crease of the right hipKey alignment check: Your left knee should be angling downward toward the floor. If it is pointing straight out to the side or upward, the hip is not yet open enough for this position — return to preparatory poses.
Step 5: Check the Foot Position (Critical for Knee Safety)
Look at your left foot placement:
✅ Correct: The outer edge of the left foot rests on the right thigh. The foot is flexed (dorsiflexed). The ankle is stable.
❌ Incorrect: The foot is plantarflexed (pointed). The foot is sitting in the hip crease rather than on the thigh. The foot is only partially on the thigh with the heel hanging.
Why this matters: A flexed foot in Ardha Padmasana stabilizes the ankle joint and transfers the rotational forces to the hip — where they belong. A pointed foot directs those forces to the more vulnerable knee and ankle. This single alignment cue prevents the majority of Ardha Padmasana-related injuries.
Step 6: Settle the Right Foot
Your right foot should rest beneath your left knee on the floor, tucked in toward the body. The right knee rests on or near the floor. Both knees are angling downward as much as your hip flexibility allows.
Step 7: Establish the Spine and Hand Position
With both legs settled:
Sit tall — lift the crown of your head toward the ceiling Lengthen your spine from the tailbone to the top of the head Roll your shoulders back and down — open your chest Chin draws very slightly in — the back of your neck is long Place your hands in one of the following positions:Hand position options:
| Chin Mudra | Chin Mudra | Index finger curls to touch thumb base, other fingers extended, palms on knees facing up | Meditation and pranayama |
| Gyan Mudra | Jnana Mudra | Tip of index finger touches tip of thumb, palms facing up | Knowledge and focus |
| Dhyana Mudra | Dhyana Mudra | Both hands in lap, right on left, thumbs touching | Deep meditation |
| Palms on knees facing down | — | Grounding, stability | Beginners |
Step 8: Close Your Eyes and Breathe
Close your eyes softly. Let your gaze turn inward (Antaranga drishti).
Take 10 slow, deep breaths — observing:
The even weight distribution through your sitting bones The natural rise and fall of your breath The sensation in your left hip and knee — which should be a mild stretch, never pain The length of your spine — resisting the urge to slouch as the minutes passStep 9: Release and Switch Sides
Hold for your intended duration (see timing guidance below), then:
Gently release your left foot from your right thigh — support it with both hands as you lower it Return to Staff Pose (both legs extended) for 5 breaths Repeat on the OTHER SIDE — right foot on left thighAlways practice both sides equally. The body naturally develops more external rotation on one side than the other, and asymmetrical practice creates imbalances that lead to injury over time.
How Long to Hold Ardha Padmasana
| Learning / First sessions | 1–2 minutes each side |
| General yoga practice | 3–5 minutes each side |
| Pranayama practice | 10–20 minutes each side |
| Meditation | 20–60 minutes each side |
| Building toward Padmasana | 5–10 minutes each side daily |
The progression principle: Increase hold time by 1 minute per week. Never increase duration if the knee is experiencing anything beyond a mild stretch sensation.
10 Benefits of Ardha Padmasana
1. Creates a Stable, Sustainable Meditation Base
Ardha Padmasana provides a triangular base (two knees and the sitting bones) that is naturally stable and self-supporting. Unlike chairs or cushions that require ongoing muscular effort to maintain posture, this triangular base allows the spine to be upright with minimal muscular demand — essential for long meditation sessions where postural collapse is common.
2. Opens the Hip External Rotators Progressively and Safely
The half-lotus foot placement creates a sustained, progressive stretch of the piriformis, obturator, gemellus, and other deep hip external rotators. Unlike dynamic stretching, the sustained hold of Ardha Padmasana creates viscoelastic deformation of these tissues — a gradual, lasting elongation that accumulates with consistent practice.
3. Improves Knee Joint Health Through Correct Hip Opening
Practiced correctly — with adequate hip preparation and proper foot alignment — Ardha Padmasana actually strengthens the structures supporting the knee by training the hip to provide the external rotation that the knee should never be asked to perform. Correctly practiced Ardha Padmasana is not a threat to the knee — it is training in protecting it.
4. Supports Pranayama Practice
All major pranayama techniques — Nadi Shodhana, Kapalabhati, Bhramari, Ujjayi — are traditionally practiced in a seated position that allows the spine to be fully upright. Ardha Padmasana creates this upright position naturally and sustainably — allowing the diaphragm to move freely, the chest to be open, and the breath to be unrestricted.
5. Activates the Muladhara and Swadhisthana Chakras
In yogic energy anatomy, the seated postures that ground the practitioner to the earth activate the Muladhara Chakra (Root Chakra) — associated with safety, stability, and physical grounding. The pressure of the heel against the perineum in Ardha Padmasana also stimulates the Swadhisthana Chakra (Sacral Chakra) — associated with creativity, emotional fluidity, and vital energy.
6. Improves Posture and Spinal Alignment
Regular practice of Ardha Padmasana trains the deep postural muscles of the spine — the multifidus, erector spinae, and transversospinalis group — to maintain a neutral upright posture without conscious effort. This postural training transfers directly into sitting, standing, and movement throughout daily life.
7. Calms the Nervous System and Reduces Stress
The sustained, still quality of Ardha Padmasana — combined with the slow breathing it naturally encourages — activates the parasympathetic nervous system through vagal tone stimulation. This produces measurable reductions in cortisol, heart rate, and the subjective experience of stress and anxiety.
8. Improves Ankle Flexibility and Foot Health
The dorsiflexed foot position required in Ardha Padmasana progressively stretches the ankle joint capsule, plantar fascia, and the muscles of the lower leg. Regular practitioners often notice significant improvements in ankle flexibility and a reduction in foot and ankle discomfort over time.
9. Deepens Meditation and Mindfulness Practice
There is a reason virtually every traditional meditation posture is a seated, grounded position. When the body is stable, symmetrical, and at ease — the mind follows. Ardha Padmasana creates the physical conditions for the mental stillness that meditation requires. The slight pressure of the foot against the thigh provides a gentle, continuous proprioceptive anchor — a physical sensation the mind can return to when it wanders.
10. Builds Progressive Access to Full Padmasana
For practitioners working toward full Lotus Pose (Padmasana), Ardha Padmasana is the essential intermediate step. It develops the hip external rotation, knee tolerance, and spinal alignment that Padmasana demands — in a format that is accessible and safe across a wide range of hip flexibility levels.
Ardha Padmasana Variations
Variation 1: Ardha Padmasana with Forward Fold (Ardha Padma Paschimottanasana)
From Ardha Padmasana, extend the bottom leg straight and fold forward over it — maintaining the half-lotus foot position on the opposite thigh. This combines hip opening with a deep hamstring stretch and is an excellent preparatory pose for Padmasana.
Variation 2: Ardha Padmasana in Supported Fish Pose
From lying down, bring one foot into half-lotus position on the opposite thigh, then lean back onto a bolster. This passive variation allows deep hip opening without the spinal engagement demands of the seated version — excellent for practitioners with lower back tightness.
Variation 3: Standing Half Lotus (Ardha Padma Vrksasana)
From Tree Pose, bring the raised foot into half-lotus position on the standing thigh rather than resting it against the inner calf. This advanced variation requires excellent hip flexibility and single-leg balance — only appropriate for experienced practitioners.
Variation 4: Ardha Padmasana Twist
From Ardha Padmasana, inhale to lengthen the spine, then exhale and rotate your torso toward the side of the raised knee. Place the opposite hand on the raised knee and the same-side hand behind the hip. This variation adds a spinal twist to the hip opening, stimulating the abdominal organs and deepening the stretch through the outer hip.
Ardha Padmasana in Meditation and Pranayama Practice
Ardha Padmasana is one of the four classical Dhyana Asanas (meditation postures) in Hatha yoga — postures specifically designed to support extended periods of seated meditation and breathwork.
Why Seated Postures Matter for Meditation
The body and mind are not separate in yoga philosophy — the state of the body directly influences the state of the mind. A collapsed, uncomfortable sitting position creates restlessness, distraction, and physical discomfort that interrupt meditation. A stable, comfortable, upright sitting position creates the physical conditions for mental stillness.
Ardha Padmasana specifically creates three qualities essential for meditation:
Sthira (Steadiness): The triangular base of two knees and sitting bones is mechanically stable — it does not shift or wobble during long sits.
Sukha (Ease/Comfort): When the hips are sufficiently open, Ardha Padmasana is genuinely comfortable for extended periods — more so than many Western sitting alternatives.
Brahmacharya (Conservation of Energy): The grounded, contained quality of the pose prevents the restless movement that dissipates energy during meditation.
Using Ardha Padmasana for Pranayama
The following pranayama practices are traditionally performed in Ardha Padmasana:
Nadi Shodhana (Alternate Nostril Breathing) — balances the left and right energy channels Kapalabhati (Skull-Shining Breath) — cleanses the respiratory system and activates the abdominal organs Bhramari (Humming Bee Breath) — calms the nervous system through vibration Anuloma Viloma — extended alternate nostril breathing with breath retention Ujjayi (Victorious Breath) — the foundation breath for all yoga and meditation practiceThe upright, open-chested position of Ardha Padmasana allows the diaphragm to move fully in all these techniques without restriction from postural collapse.
Ardha Padmasana: Precautions and Contraindications
Ardha Padmasana is a safe pose for most practitioners when approached with correct preparation and alignment. However, the following conditions require caution or modification.
⚠️ Practice with Caution
Tight hips: Never force the foot onto the thigh if the hip is not sufficiently open. Practice preparatory poses for 4–8 weeks first. Forcing the position before the hip is ready causes rotation at the knee — the primary source of yoga knee injuries.
Sacroiliac joint instability: The asymmetrical hip position of Ardha Padmasana can aggravate SI joint instability in some practitioners. If you experience lower back or sacral pain during the pose, practice the supported or reclined variations instead.
Sciatica: The piriformis stretch in Ardha Padmasana can either relieve or aggravate sciatica depending on the individual. If the pose increases sciatic symptoms (pain, tingling, or numbness radiating down the leg), stop immediately and consult a physiotherapist.
❌ Avoid the Pose
Acute knee injury: Any active inflammation, ligament damage, meniscal injury, or post-surgical recovery in the knee. Wait for full medical clearance before practicing any poses that place the knee in flexion with external rotation.
Severe hip arthritis: Advanced arthritis in the hip joint may not allow the range of external rotation required. Work with a yoga therapist to find appropriate alternatives.
Recent hip surgery or hip replacement: Always obtain explicit clearance from your orthopedic surgeon before practicing any yoga pose that places the hip in external rotation after surgery.
Ankle sprains or fractures: The ankle position in Ardha Padmasana requires stability in the joint. Practice alternative seated poses during ankle recovery.
Common Mistakes in Ardha Padmasana
❌ Forcing the Knee Down
Pressing the knee toward the floor when the hip is not open enough causes torsional stress on the knee ligaments. The knee should descend naturally as a result of hip flexibility — never by external force.
❌ Foot Plantarflexed (Pointed) Instead of Flexed
A pointed foot in the half-lotus position removes the ankle’s protective role and transfers stress to the knee. Always keep the foot dorsiflexed (flexed toward the shin) when the foot is on the thigh.
❌ Sitting on the Back of the Thighs Rather Than the Sitting Bones
This causes the pelvis to tilt backward, the lumbar spine to round, and the entire posture to collapse. Always sit on the sitting bones — use a blanket under the hips if needed.
❌ Rounding the Spine
The spine must remain upright throughout. When the posture begins to collapse (as the hip and back muscles fatigue during long sits), either use a wall for back support, reduce the hold time, or add a cushion under the sitting bones.
❌ Practicing Only on One Side
This creates asymmetrical hip development, uneven SI joint loading, and muscle imbalances through the pelvis and lower back. Always practice Ardha Padmasana for equal time on both sides.
❌ Rushing to Full Lotus Pose
Ardha Padmasana is not a stepping stone to rush past — it is a complete practice. Many experienced meditators choose to remain in Ardha Padmasana permanently because it is more comfortable and sustainable than full Padmasana for their body type and hip structure. Honor where your body is.
How to Build Ardha Padmasana into a Daily Practice
Week 1–2: Preparation Only
Practice the 5 preparatory poses (Butterfly, Fire Log, Reclined Figure Four, Half Pigeon, Wide-Angle Forward Fold) for 10–15 minutes daily. Do not attempt Ardha Padmasana yet.
Week 3–4: First Attempts
After your preparatory sequence, attempt Ardha Padmasana for 1–2 minutes on each side. Focus entirely on correct alignment — foot position, spine, sitting bones — not on duration.
Week 5–8: Building Duration
Increase hold time by 1 minute per week on each side. Add 5 minutes of pranayama practice (Nadi Shodhana) in the pose. Notice how the hip opens gradually with consistent practice.
Month 3 onward: Meditation Integration
Ardha Padmasana is now your primary seated meditation posture. Begin extending meditation sits in the pose — starting with 10 minutes and building toward 20–30 minutes as the body allows.
Conclusion
The lotus does not force itself to bloom. It simply creates the right conditions — roots in the mud, stem reaching through water, bud rising toward light — and the opening happens in its own time.
Ardha Padmasana asks the same of you. Not force. Not ambition. Not comparison with practitioners who can drop their knee to the floor with ease. Only consistent, patient preparation — and the willingness to meet your body exactly where it is today.
Practice the preparatory poses. Honor the foot alignment. Sit for one minute, then two, then five. Let the hip open at its own pace. And in the stillness of the pose — whether you have been practicing for one week or ten years — you will find what all sitting practices ultimately point toward: a quality of presence that does not depend on the depth of the posture.
The half lotus is enough. It has always been enough.
Begin where you are. Your stillness is waiting — visit TheShivYoga.com and sit with us.
Disclaimer: This article is for informational and educational purposes only. It does not constitute medical advice. If you have any existing knee, hip, or ankle conditions, consult a qualified healthcare provider or yoga therapist before attempting Ardha Padmasana. Never practice through pain.
Key Takeaways
Ardha Padmasana means “Half Lotus Pose” in Sanskrit — one foot on the opposite thigh, one foot on the floor. It is the essential preparation for and alternative to full Padmasana (Lotus Pose). The most critical safety principle: all rotation must come from the hip — never from the knee. Hip preparation for 4–8 weeks before attempting the pose prevents the majority of yoga knee injuries. Foot alignment determines knee safety — the foot must be dorsiflexed (flexed, not pointed) when placed on the thigh, and the ankle (not the foot arch) should rest on the thigh. Five preparatory poses — Butterfly, Fire Log, Reclined Figure Four, Half Pigeon, and Wide-Angle Forward Fold — are essential before attempting Ardha Padmasana. The pose provides 10 specific benefits including stable meditation base, hip external rotator opening, pranayama support, chakra activation, postural improvement, and nervous system regulation. Always practice both sides equally — asymmetrical practice creates hip and SI joint imbalances over time. Ardha Padmasana is one of the four classical Dhyana Asanas — traditional meditation postures described in the Hatha Yoga Pradipika — and is a complete practice in its own right, not merely a stepping stone. Build duration gradually — 1 minute per week per side. Never rush toward the full Padmasana if Ardha Padmasana is comfortable and sustainable for your body.FAQ Section
Q1. Can anyone practice Ardha Padmasana, or are there restrictions?
Ans: While doing this Padmasana is accessible to most people, individuals with knee or hip injuries should consult a yoga instructor or healthcare professional before attempting it.
Q2. How long should I hold Ardha Padmasana?
Ans: Initially, hold the pose for 30 seconds to 1 minute. With practice, you can extend the duration.
Q3. Can Ardha Padmasana be practiced during pregnancy?
Ans: It’s best to avoid this pose during pregnancy, especially in the later stages. Consult your healthcare provider for suitable prenatal yoga poses.
Q4. Is Ardha Padmasana suitable for beginners?
Ans: Yes, beginners can practice these Padmasanas with the use of props and gradual progression.
Q5. What should I focus on during Ardha Padmasana?
Ans: Focus on your breath, maintaining a calm and steady rhythm. This will enhance the meditative aspect of the pose.