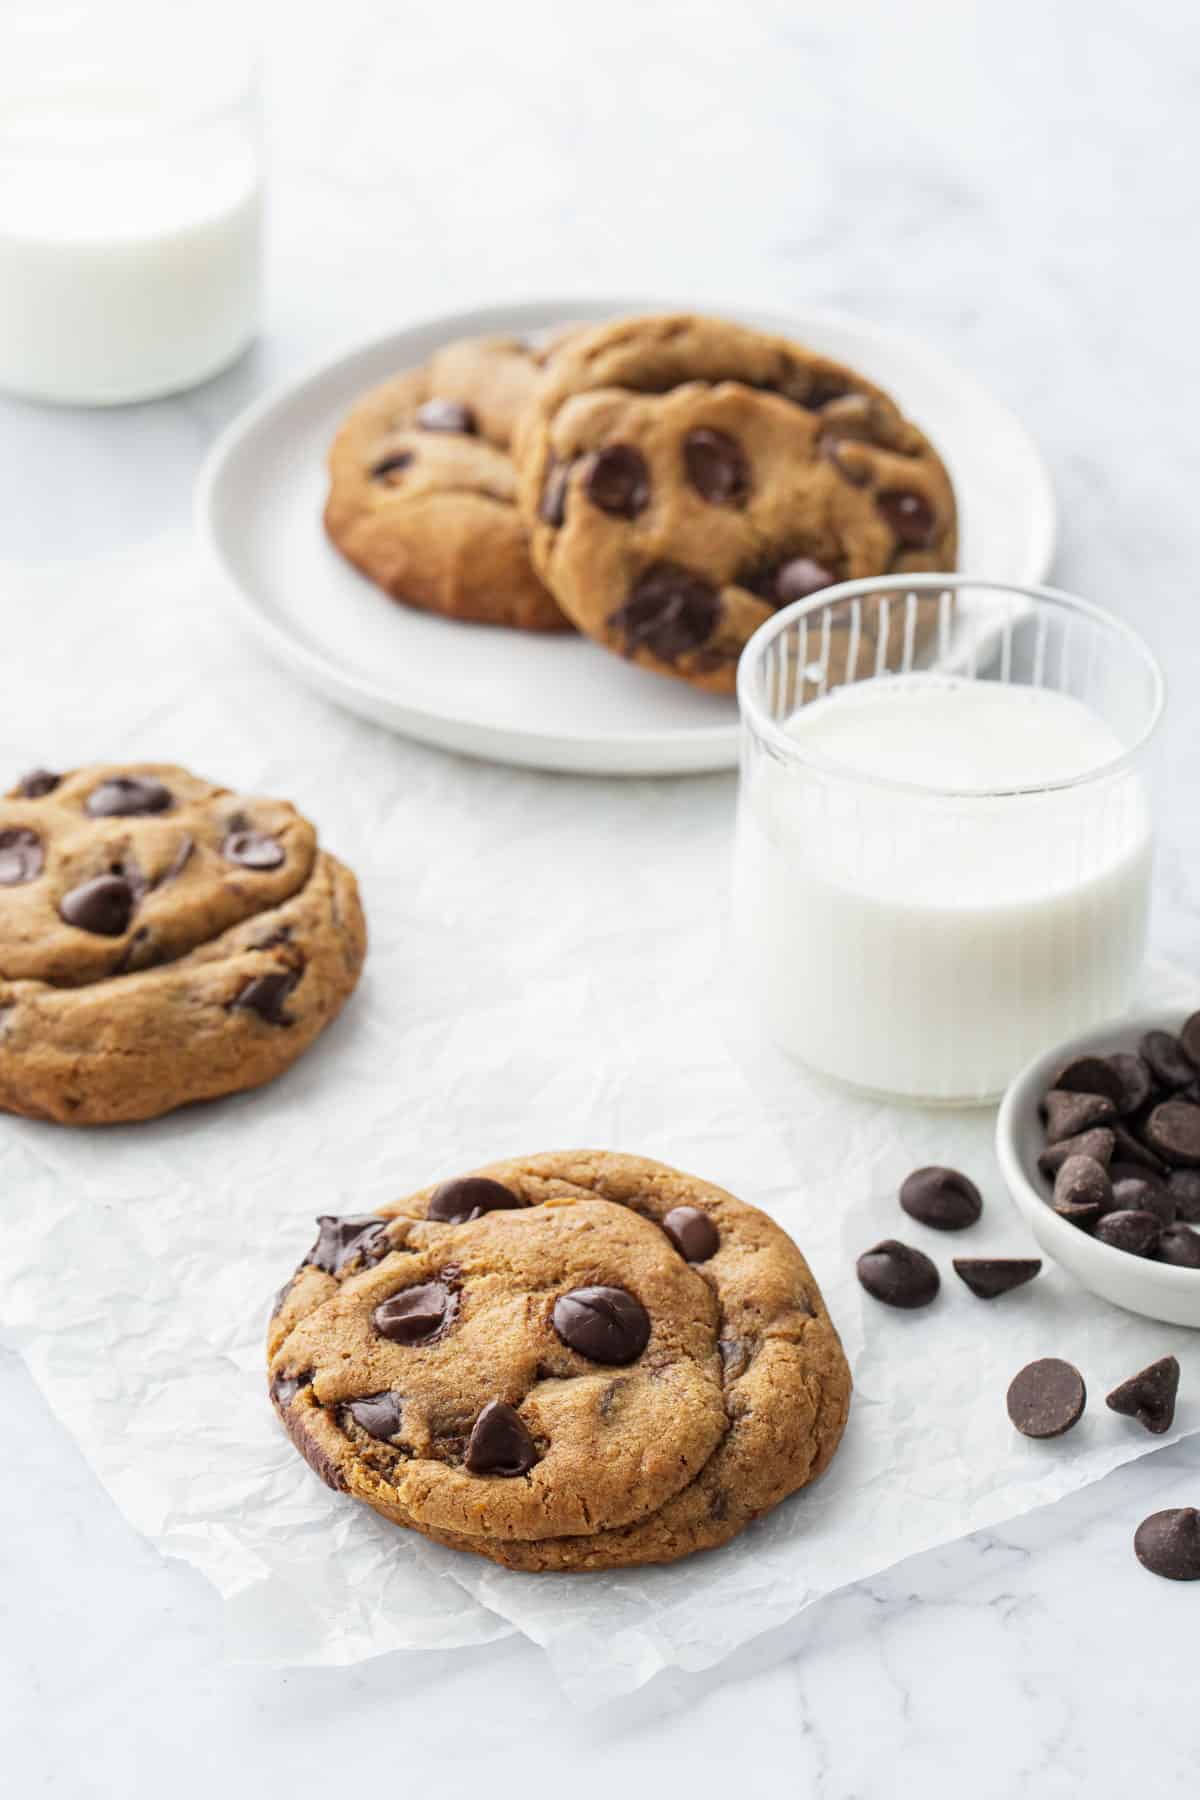
Brown Butter Chocolate Chip Cookies (Extra Large, Bakery Style)
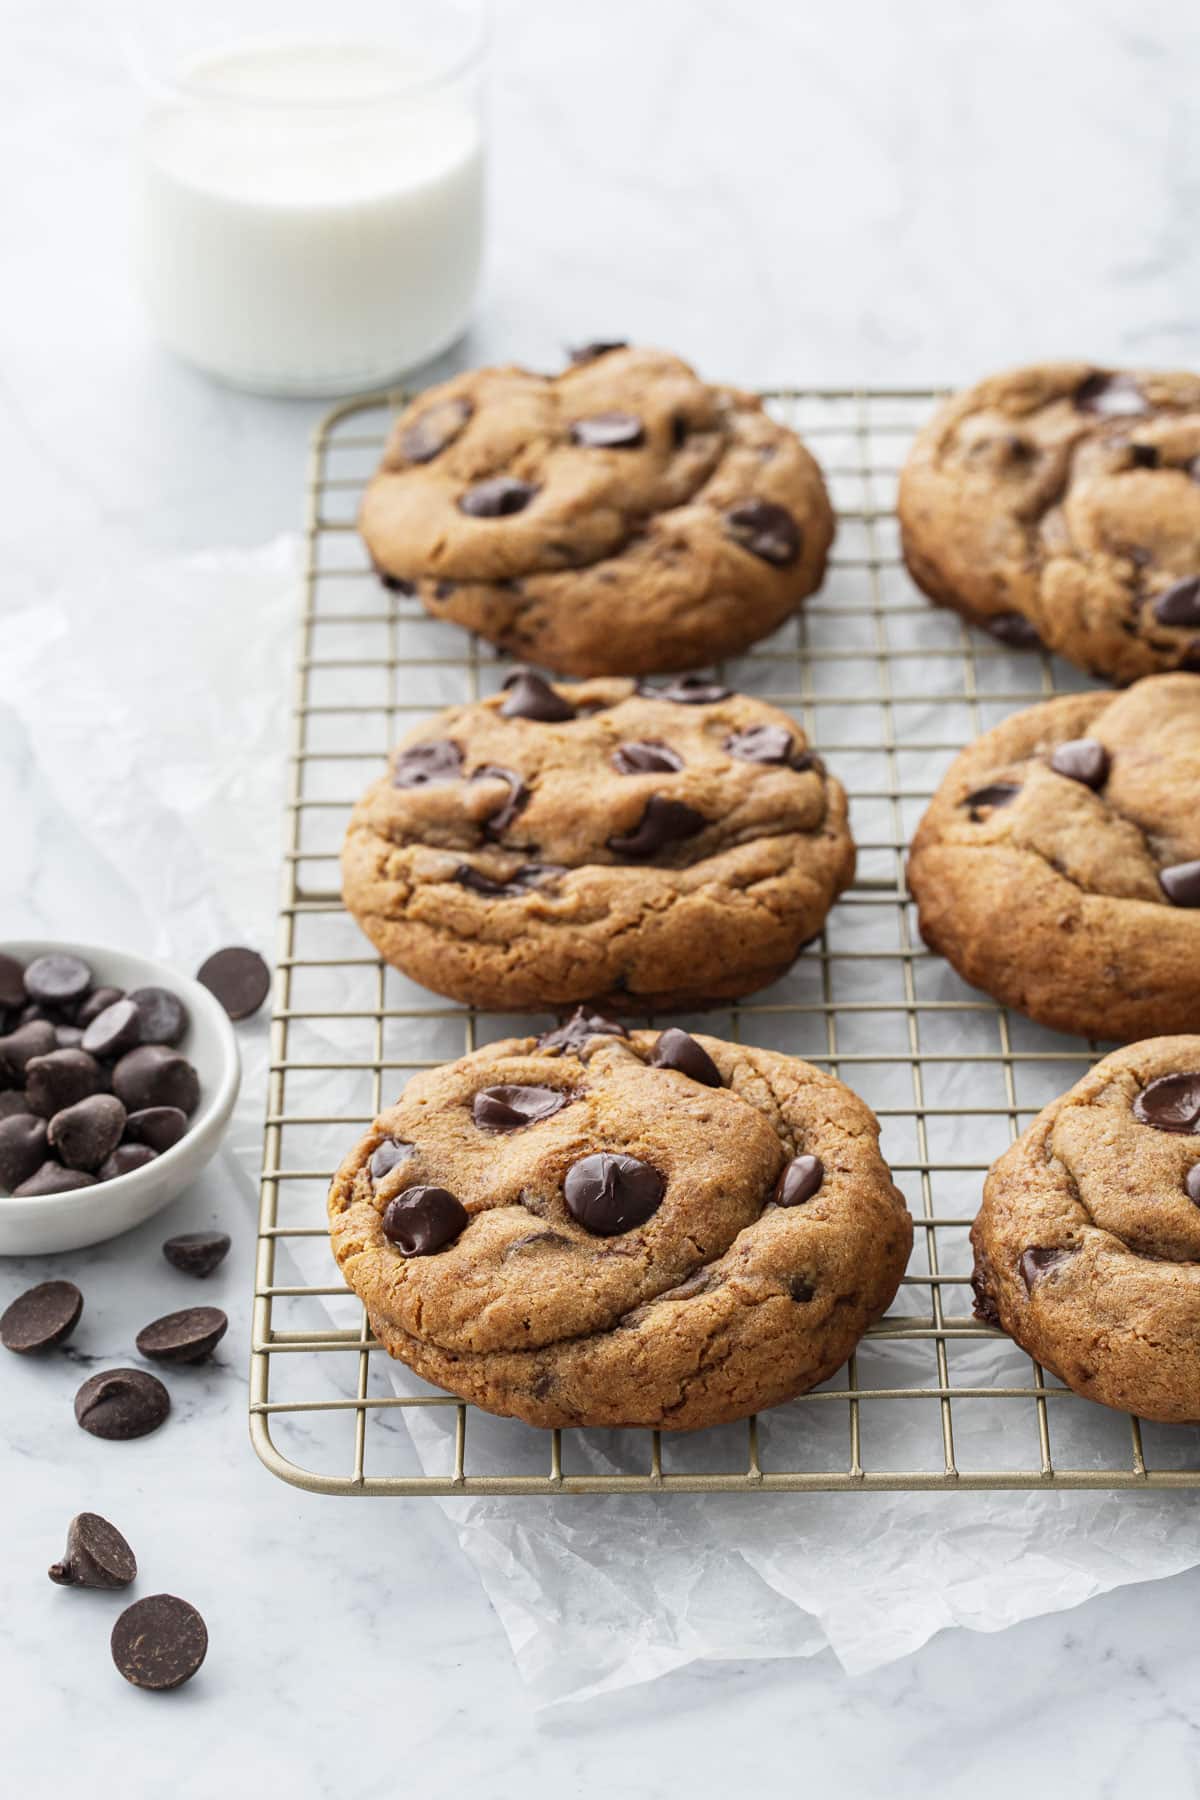
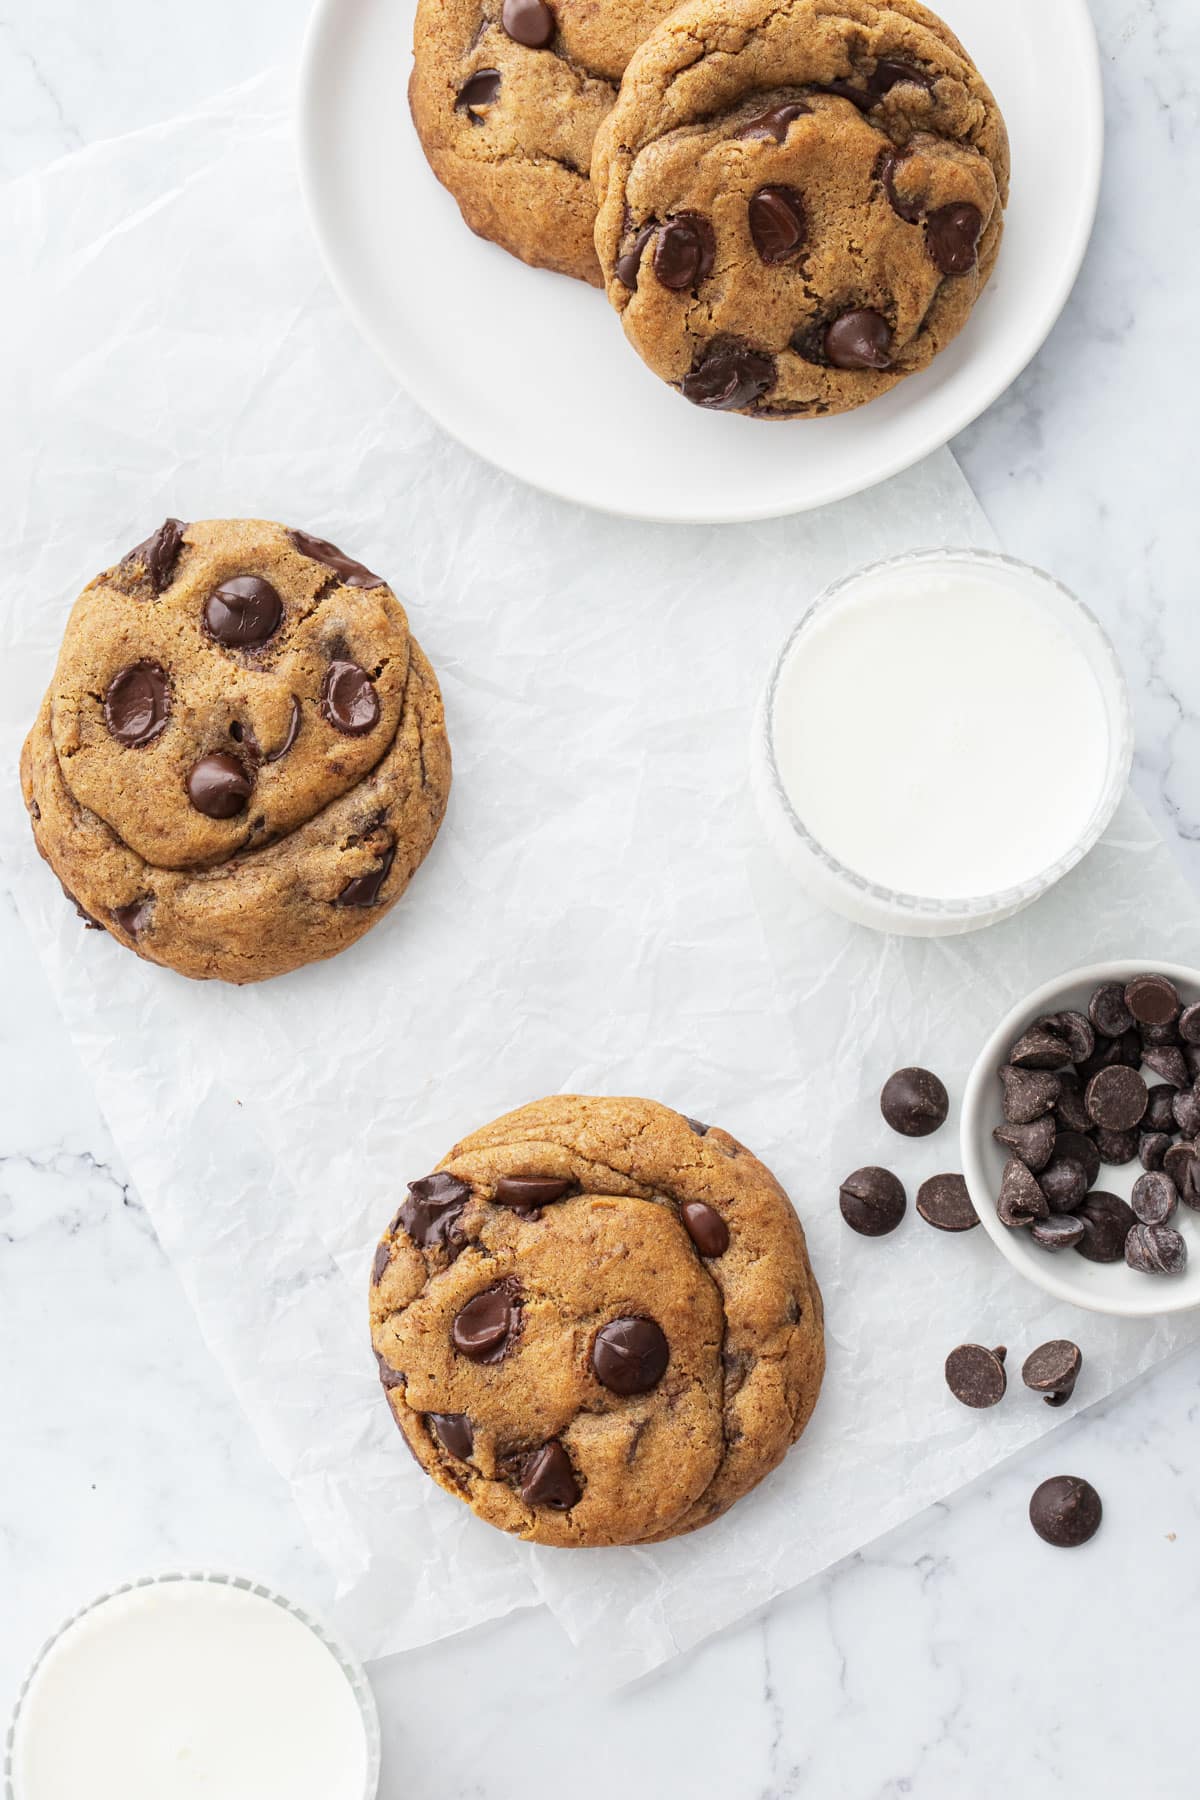
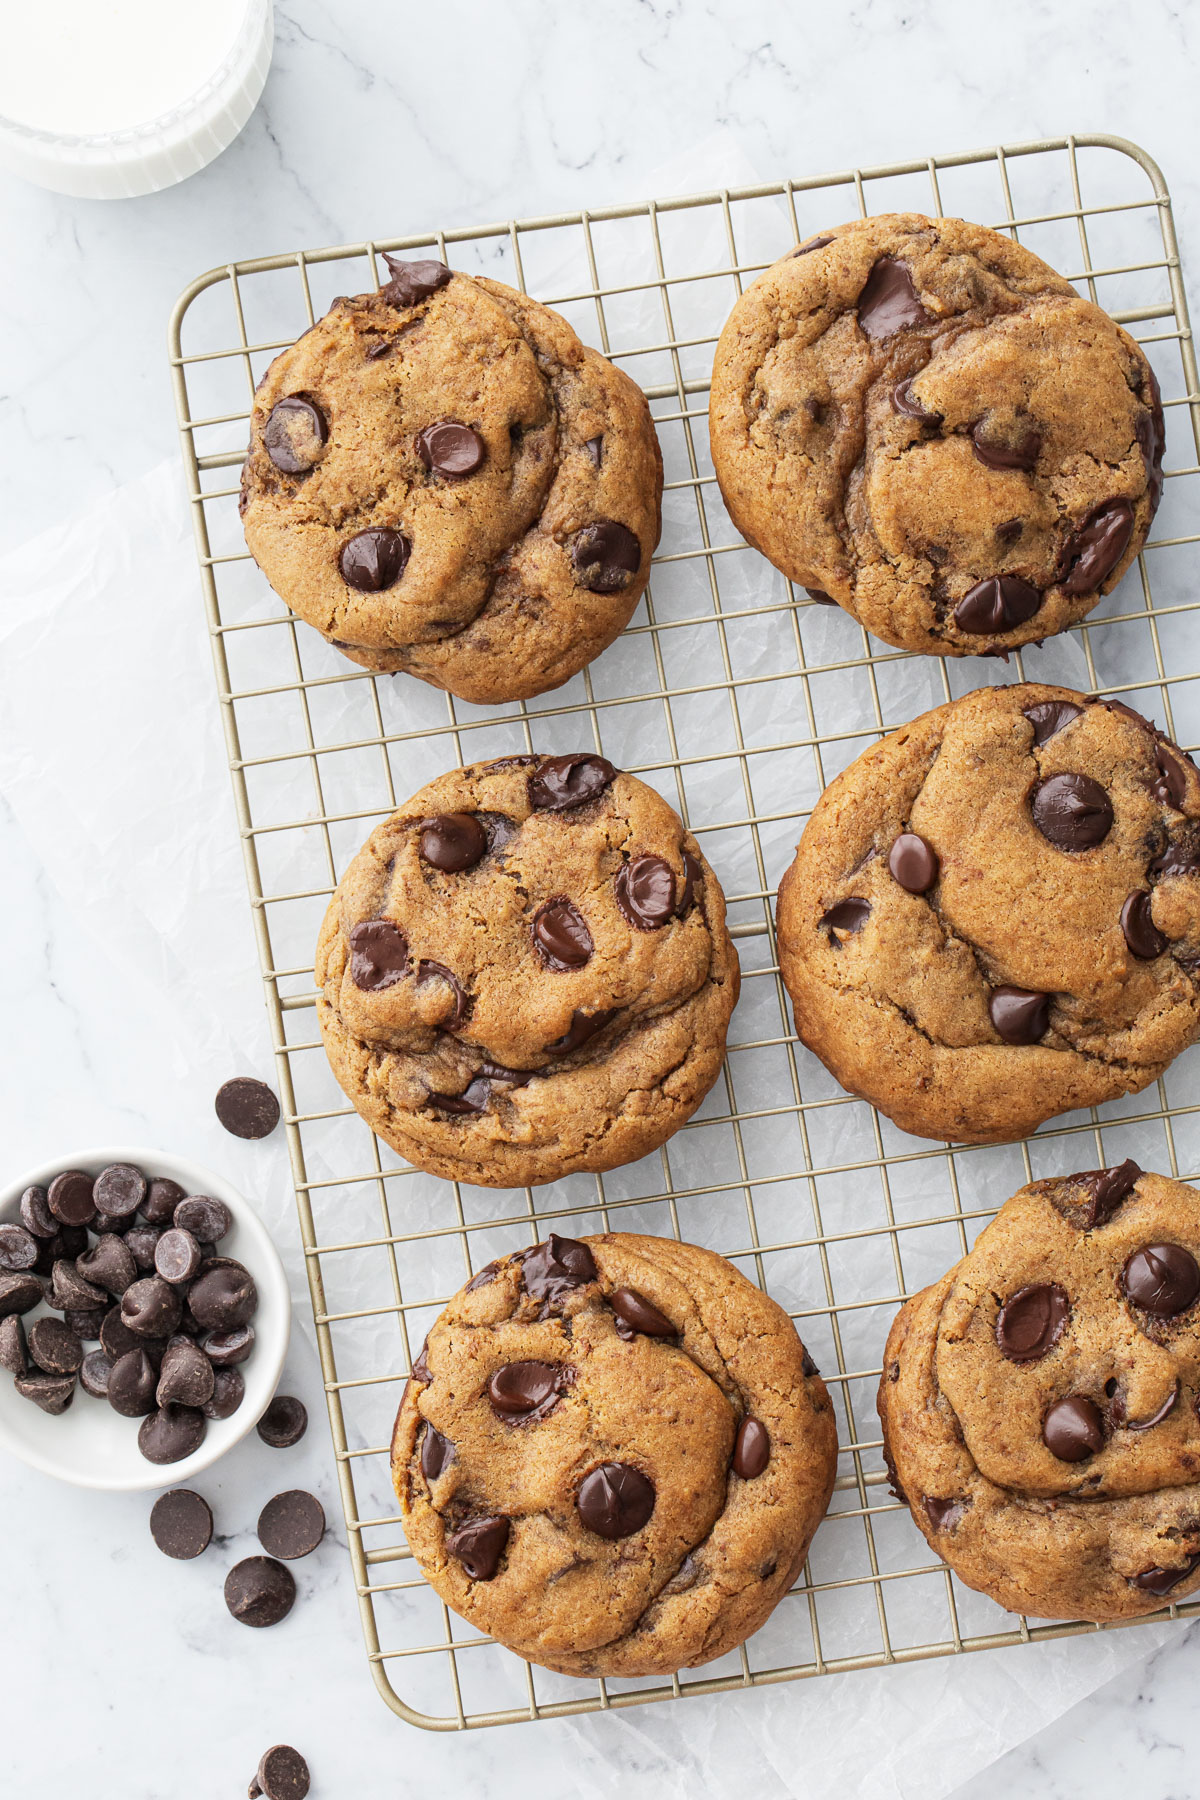
These cookies are just… extra. Extra large, extra gooey-in-the-middle, with an extra toasty, extra brown buttery flavor and a texture I can only describe as lush. Tollhouse could never. This small batch recipe makes 6 obscenely large cookies (equivalent...
 Konoly
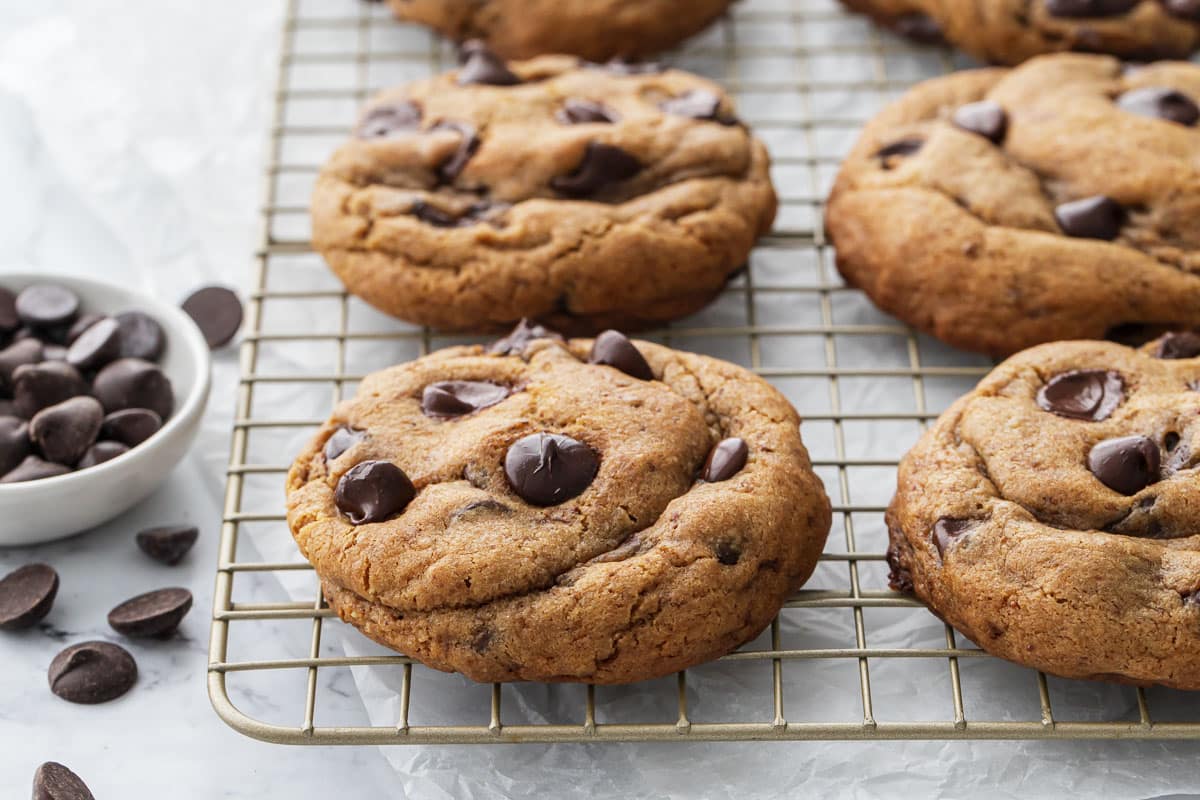
These cookies are just… extra. Extra large, extra gooey-in-the-middle, with an extra toasty, extra brown buttery flavor and a texture I can only describe as lush. Tollhouse could never.
This small batch recipe makes 6 obscenely large cookies (equivalent to 12 normal sized ones), but feel free to double or triple the recipe (they freeze beautifully before or after baking). Even better… because it uses melted brown butter, there’s no electric mixer required—the entire recipe can be mixed by hand.
There are a million and one brown butter chocolate chip cookie recipes out there on the internet, but I wanted something impeccable, that was just a little bit different than all the others.
Which is… harder than it sounds.
Needless to say, these cookies have been a long time coming.
And by a long time I mean I’ve tested least 7 test batches baked over the course of the last few months (a sacrifice I’m happy to make). Each time tweaking one tiny little thing to improve the texture, flavor, and/or appearance (or all three). I think there is a reason I haven’t done a basic chocolate chip cookie recipe before now (the closest I’ve come is probably these ganache-stuffed beauties) and that’s because all my years of baking knowledge and know-how was needed to tweak these cookies to perfection.
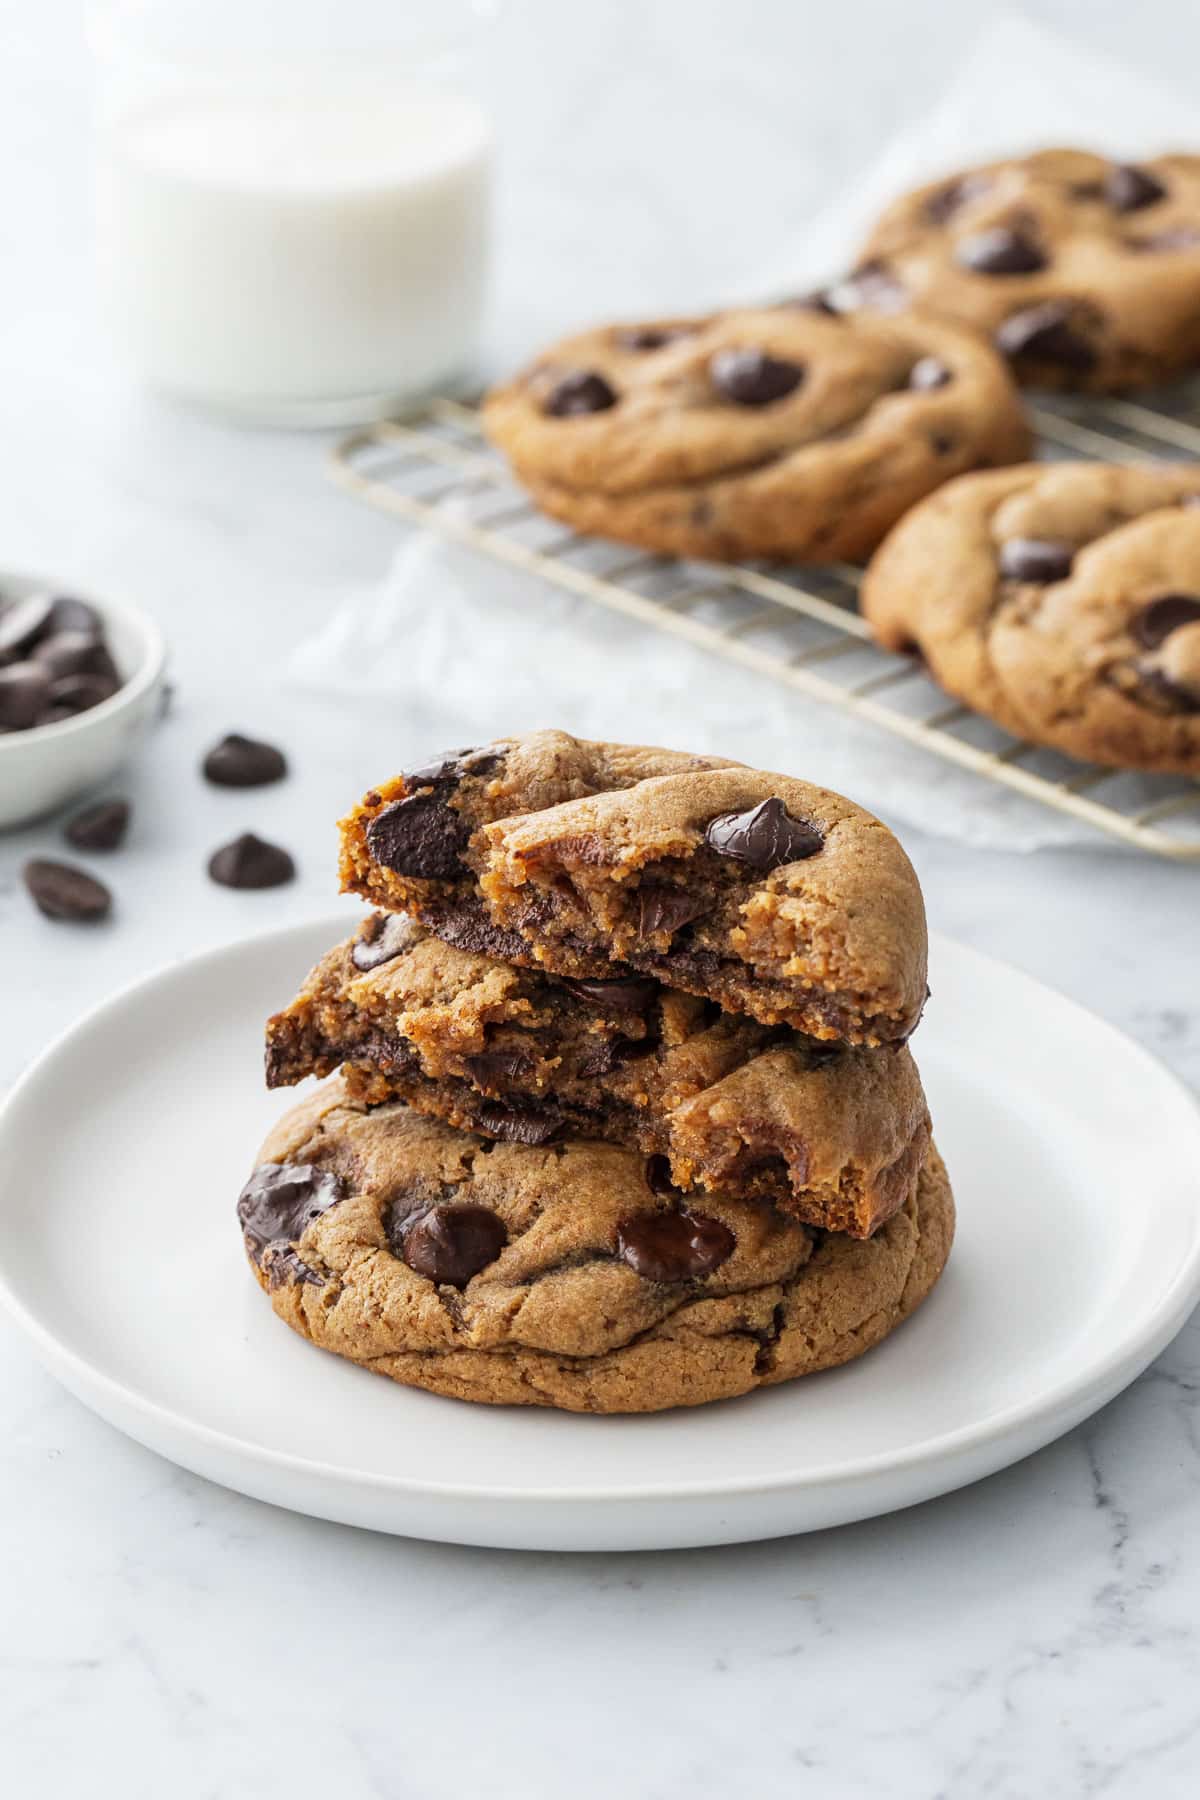
Normally I go for cookies that spread thinly and evenly for an overall chewy experience, like these pistachio chocolate chip cookies. But this time I wanted a cookie with more substance, a cookie with some meat on its bones, thick and plush and even borderline fudgy, gooey in the middle but still crisp and chewy on the edges, with the perfect balance of buttery cookie to pockets and puddles of rich, dark chocolate.
That’s… a lot to ask of a cookie. (Now you see why it took me so long?)
I ultimately achieved this cookie convergence by precise proportions of flour, sugar, and fat, baking soda (and definitely no powder, which caused the cookie to be overly cakey for my tastes), and by shaping the dough into, of all things, snowmen. Plus a thorough chill and a nice hot oven temperature.
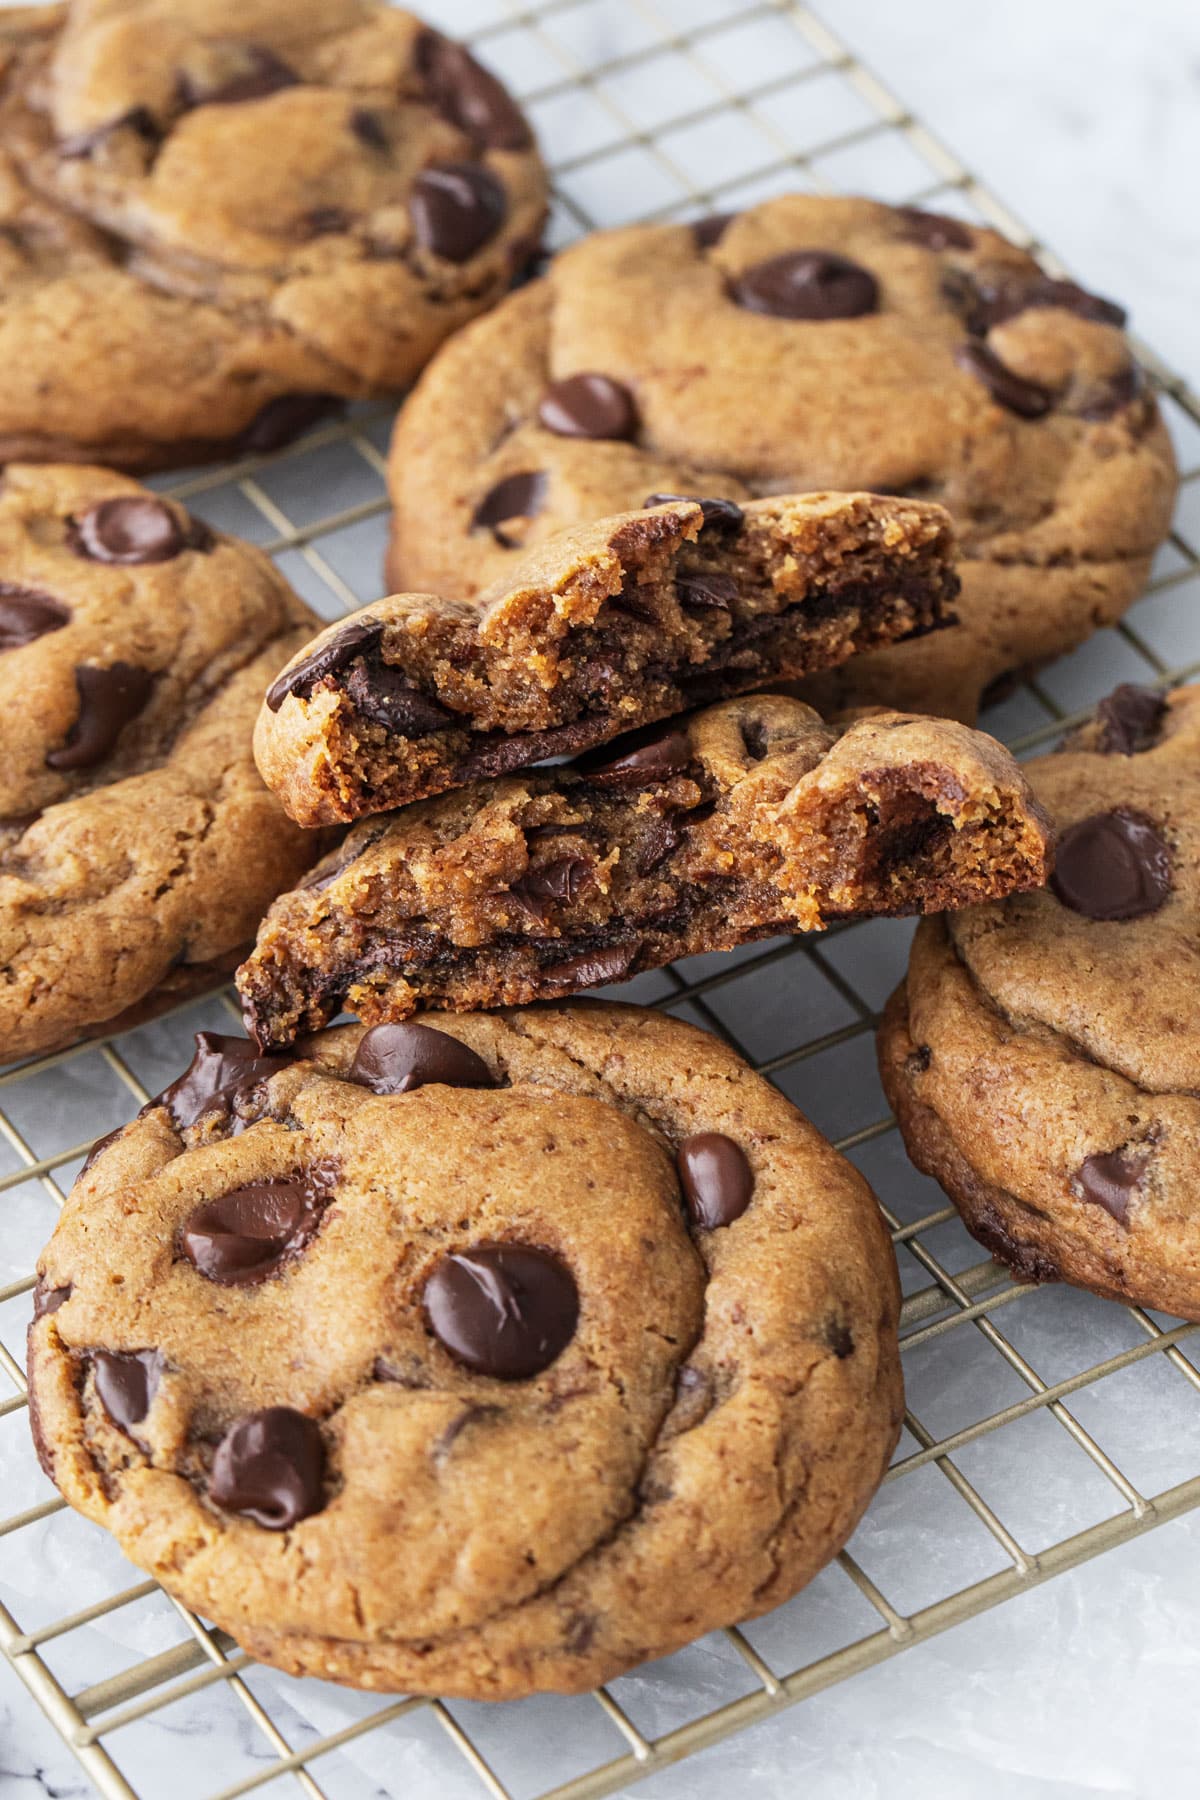
The resulting cookies are oversized and flavor packed, with a robust, toasty brown butter flavor that’s complimented and enhanced by a combination of not-so-secret ingredients: dry milk powder, dark brown sugar, and instant espresso powder, plus cornstarch and an extra egg yolk for the most tender and fudgy cookies of your dreams.
So why brown butter?
When you brown butter, you are cooking the butter until the water evaporates and the milk solids sink to the bottom of the pan and darken to a deep golden brown color and robust, nutty flavor. And the flavor… think about the difference between granulated sugar and caramel. Or plain bread and toast. It’s the same with regular and brown butter: the act of browning (aka the Maillard reaction) results in more complex flavor compounds. Gosh I love science (especially when it involves sugar and butter).
I also add a few teaspoons of dry milk powder (secret ingredient #1), which essentially increases the amount of milk solids that are available for browning, so you get more brown bits without actually needing more butter. And those brown bits? That’s where all the flavor comes from.
Since browning the butter removes all excess water from the butter, which can result in an overly greasy cookie, the recipe calls for 2 teaspoons of milk (don’t skip that part!)

Life is Butter Dream
Butter lovers stick together! Get your Life is Butter Dream tshirt, tea towel, tote, apron, or sticker today from Fresh Baked Puns.
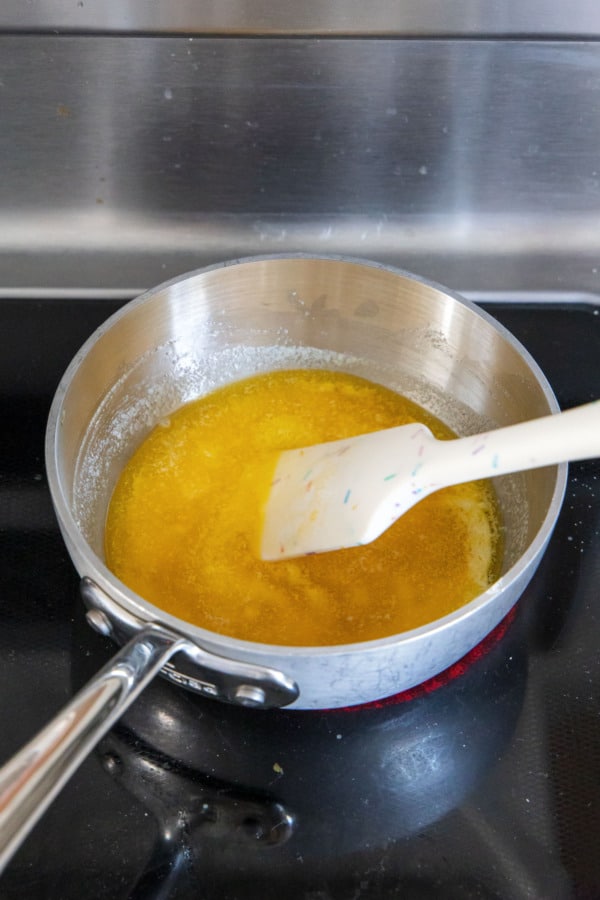
I recommend cooking your brown butter in a light-colored pan so you can more easily see the browning. The extra milk powder will make it foam up quite a bit more than normal. But once the butter is quiet (which means all the water is gone), it will start to brown very quickly, so keep a very close eye on it after that. The foam will have a bit of a brownish tint as well if you’re unable to see the bottom.
Once the butter gets to the color you want immediately remove from heat and pour it into your mixing bowl lest it keep browning (and while brown butter is lovely, burnt butter is decidedly not).
Size Matters
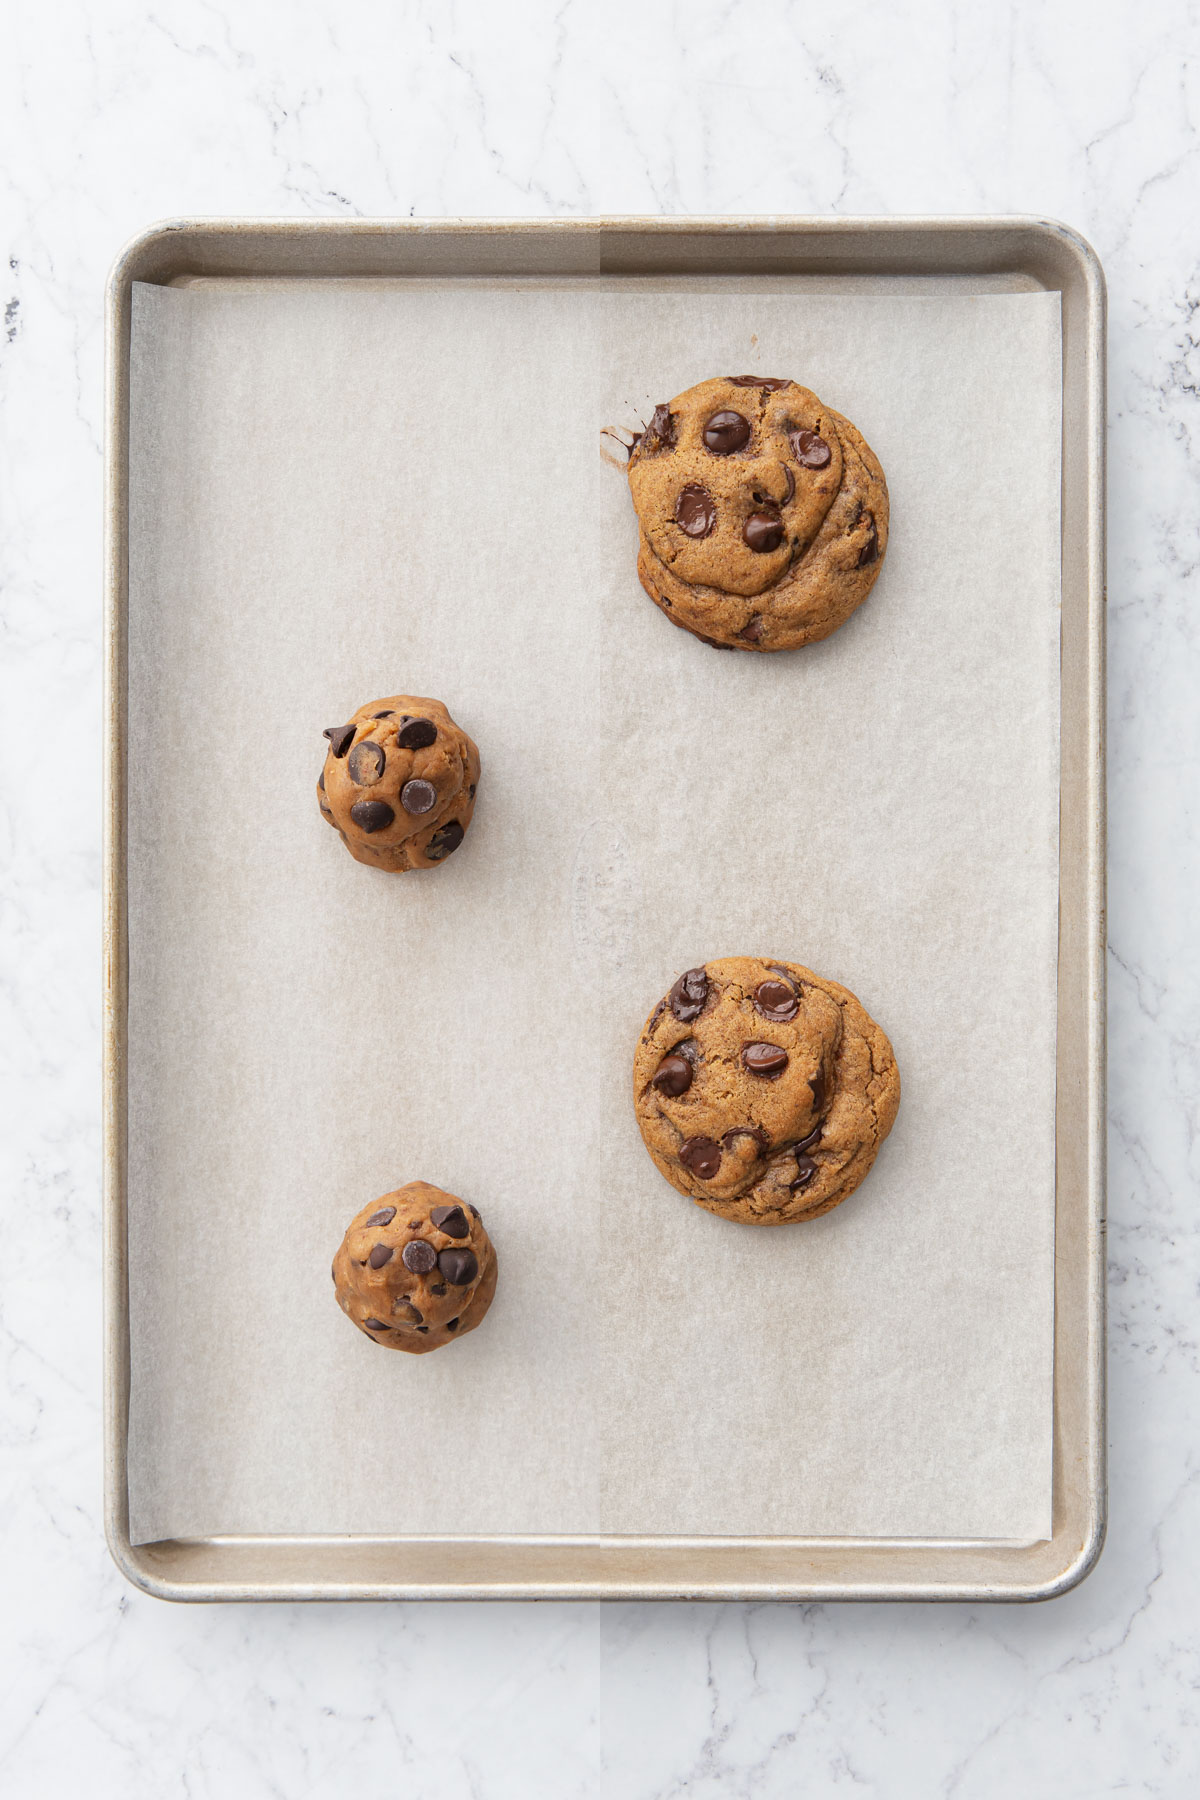
It’s hard to tell from the photos, but these cookies are massive. About 100g or 3.5 ounces each. (Compare that with about 50-60 grams for normal sized chocolate chip cookies.)
But I was going for a true bakery style cookie, and let’s face it, bakery cookies are always bigger than the ones you make at home.
50g: A normal size, medium cookie scoop. But since these cookies don’t spread a whole lot, they end up pretty round and puck-like. Bake for 10-11 minutes.
75g: A satisfyingly large cookie. Use a large cookie scoop and bake for 14-15 minutes.
100g: I ultimately landed on this as my ideal size, it’s the perfect cookie for two. Two medium scoops or a heaping large one. Bake for 15-16 minutes.
150g: for true Levain-style cookies, these things are monsters. You’ll only get 4 cookies out of a single batch of this recipe. Bake for 16-18 minutes.
Measuring dough: To get super accurate weights, I put my dough bowl on the scale and tare it to 0. Then scoop. The weight will go into the negatives, just scoop until you have -100g or whatever your target weight. Then re-tare and scoop the next ball.
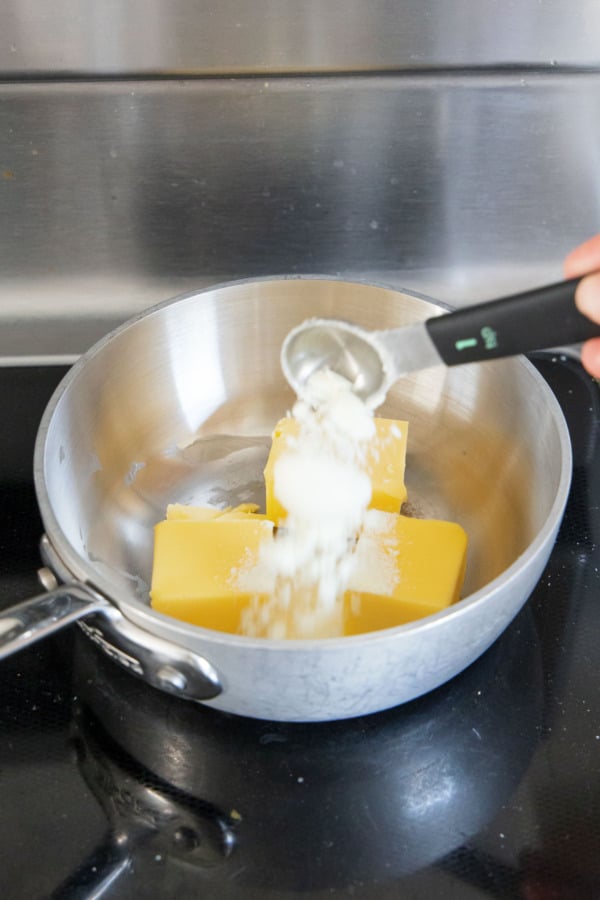 Combine butter and milk powder in a small, light-colored saucepan.
 Melt, stirring occasionally, until butter is fully melted and starts to sputter and foam.
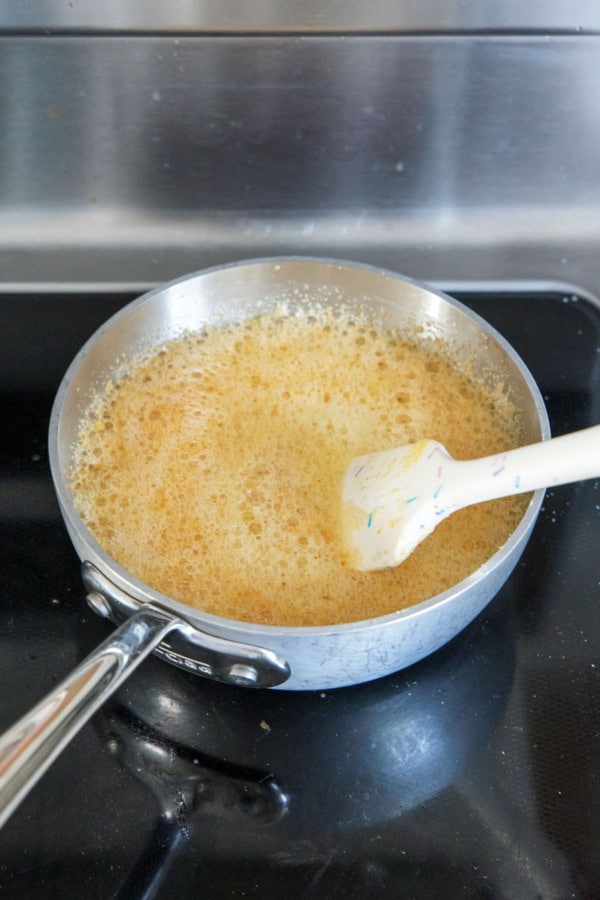 Continue to cook, stirring regularly, until the bits of milk solids are golden brown (the foam will be a bit browner in color too).
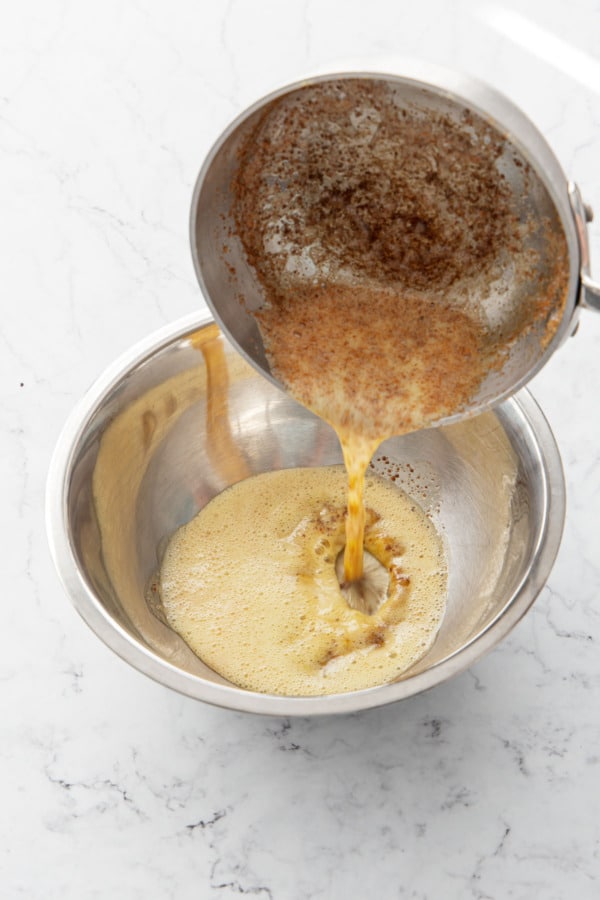 Immediately pour brown butter into a heat-proof mixing bowl and let cool to lukewarm (under 100 degrees F).
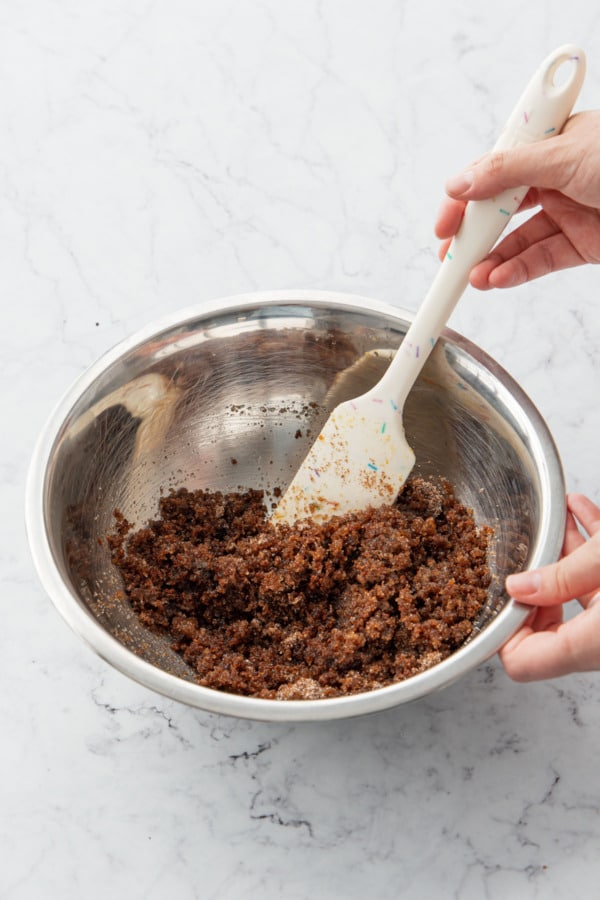 Add white and dark brown sugars to mixing bowl with butter and stir until evenly moistened.
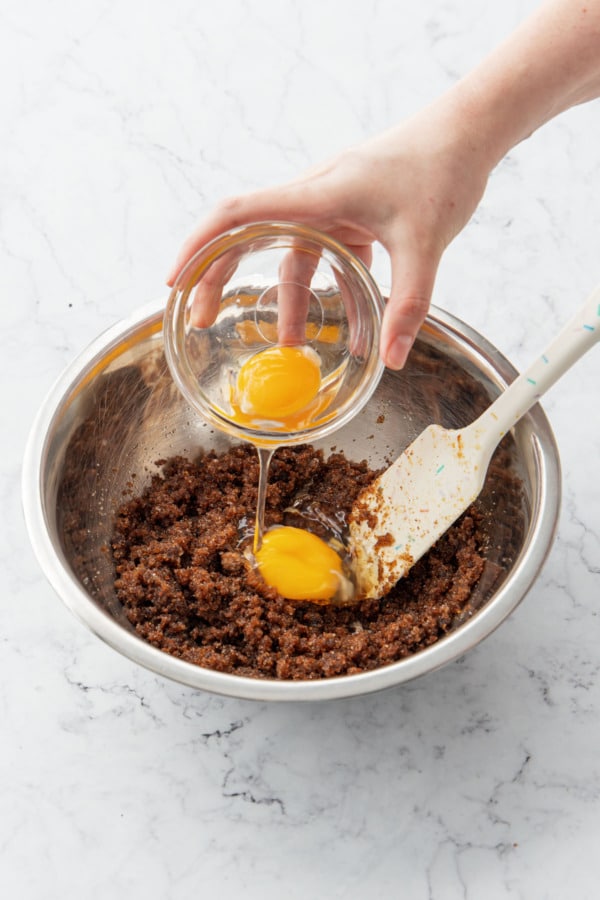 Add egg and egg yolk and stir until smooth.
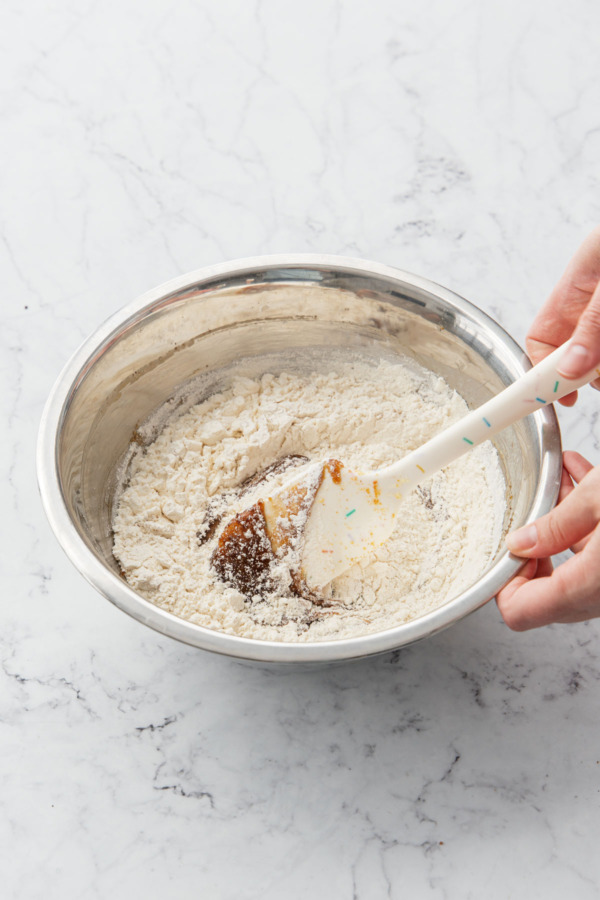 Add dry ingredients (flour, salt, baking soda, cornstarch and espresso powder) and mix until almost fully incorporated.
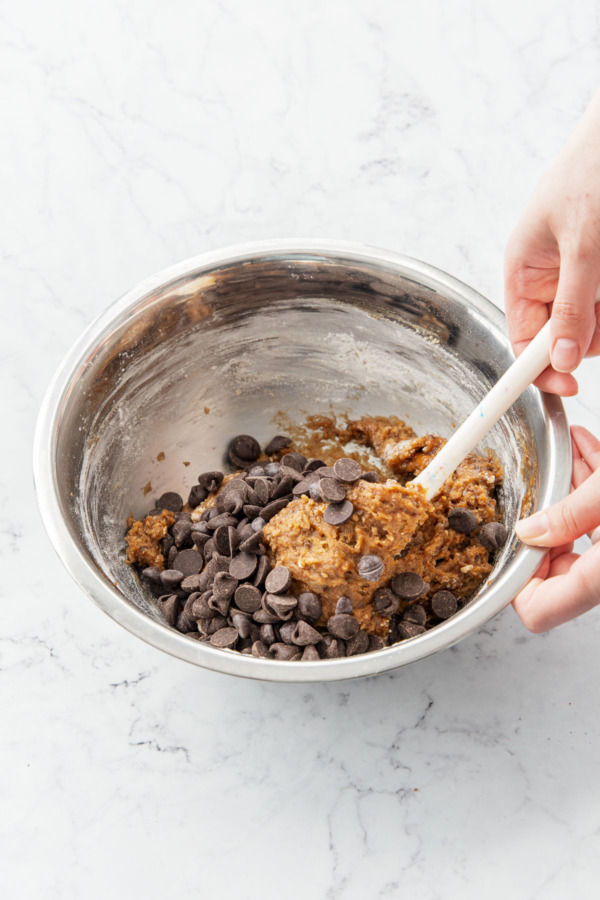 Add chocolate chips and fold until evenly distributed throughout the dough.
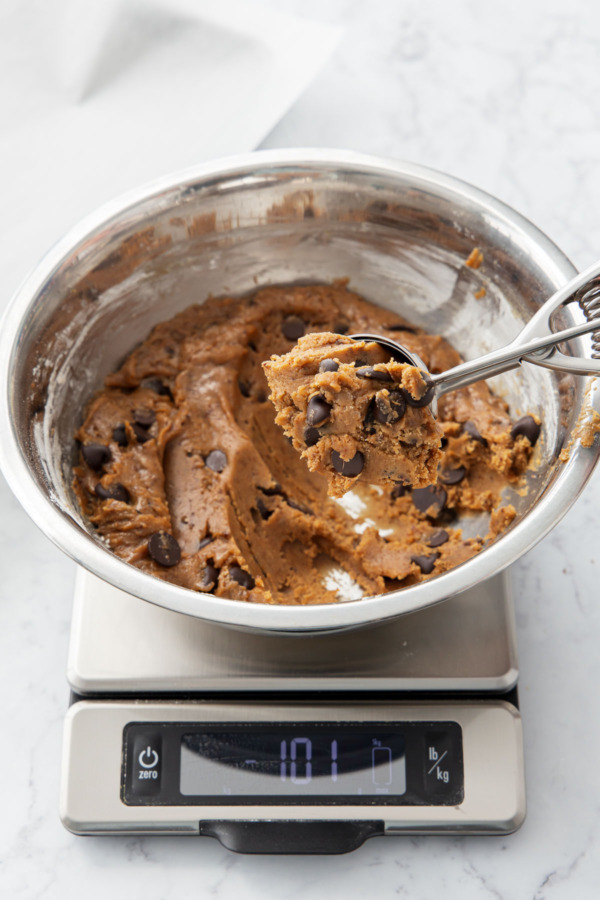 Chill dough for 15 minutes until slightly firmer, then scoop into large 100 gram balls (use a scale to weigh them perfectly).
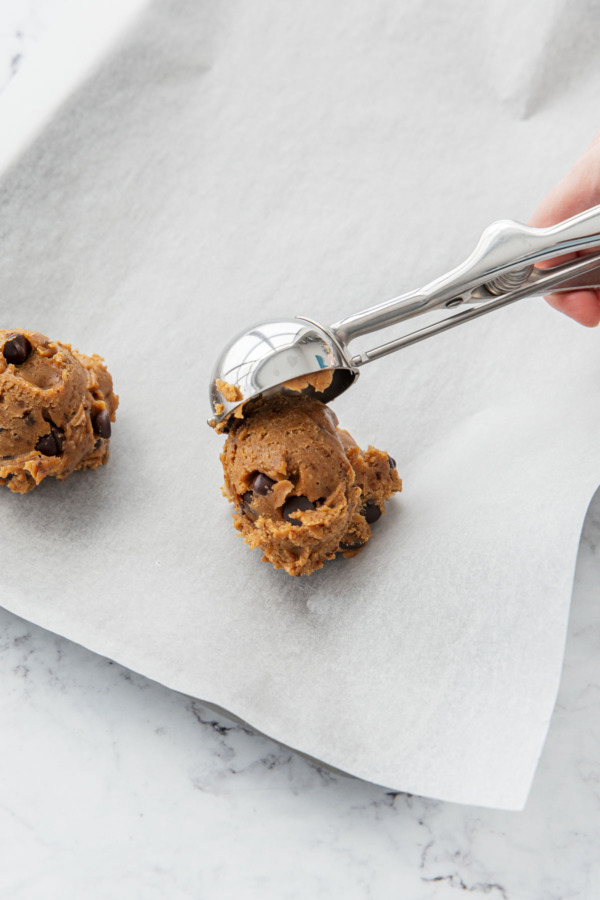 Drop dough balls onto a parchment lined baking sheet (they can be close together as they will be chilled first).
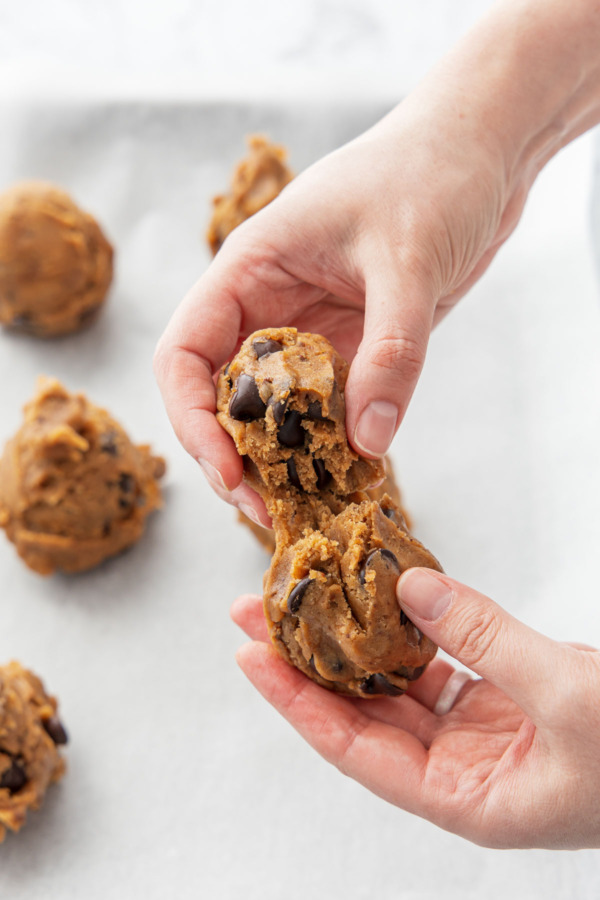 Break each dough ball into two pieces, one slightly smaller than the other.
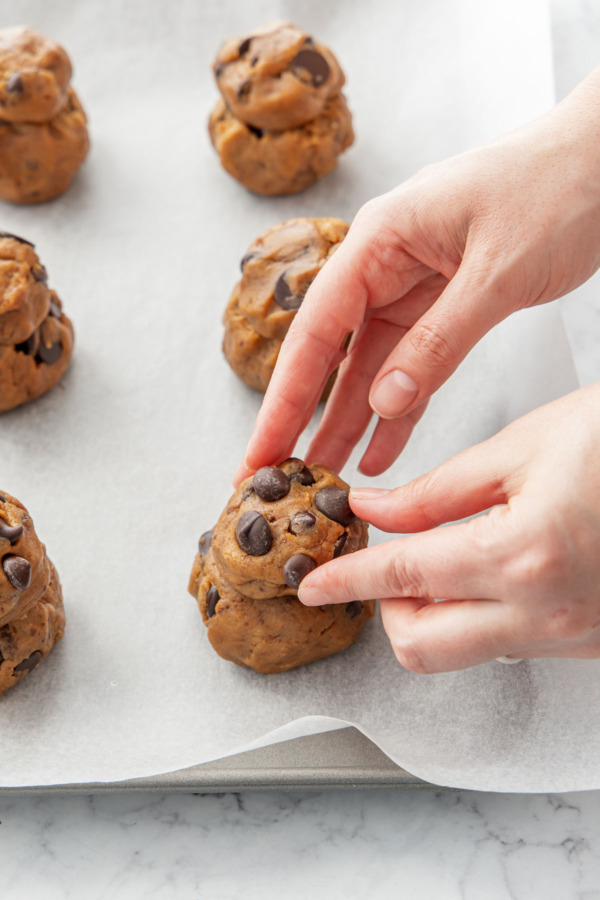 Stack the dough balls to form a little snowman shape (this will help the cookies stay nice and tall).
Do you want to build a snowman?
Ok ok hear me out: the little snowmen I shaped my dough balls into are not just for looks. Or, well, they are, but for the look of the final cookie and not just because little cookie dough snowmen are cute.
Rather than a regular ball that spreads and gives you a flat-ish top, the snowman slumps down into a noticeable ridge or crease that I think makes the cookies look more appealing.
The extra tall shape also keeps the cookies nice and thick in the middles. You could shape your dough balls into taller balls (think upside down snow cone) to achieve a similar effect.
This cookie dough does need to be chilled. I like to shape the dough first while it’s still soft and pliable, and then chill the rolled dough balls for at least 2 hours but ideally overnight.
You can also freeze the shaped dough balls to bake at a later date. Freeze on the cookie sheet, then transfer to a zip-top bag or other airtight container to prevent freezer burn.
When baking from frozen, reduce the oven temperature to 325 degrees F and bake for 18 to 20 minutes instead. The cookies might spread a bit more but the lower temperature will help the cookies bake more evenly and not be raw in the middle while the bottom gets burnt (which can sometimes happen with frozen cookie dough).
You can also freeze cookies after baking (my preferred method). Just let them fully cool, then wrap individually or by two in plastic wrap and place in a zip-top bag. Let come to room temperature for 20-30 minutes before eating.
Ingredient Notes & Substitutions
European-style Salted Butter: I typically use standard unsalted American-style butter for 90% of my recipes, but since the butter is the star here, I opted for the good stuff. And the good stuff I have on hand is always salted (because sourdough yearns for salted butter). So that’s what I used. I really do think you can taste a difference between regular and European-style butter, but this recipe should still work with American-style butter too.
If using unsalted butter, increase the salt to 3/4 teaspoon.
Dry milk powder: Adding a few teaspoons of milk powder to the butter makes for even more toasty brown bits (aka what makes the brown butter magical), resulting in an more prominent brown butter flavor in the final cookies. That said, totally fine to omit this, your cookies will turn out just fine.
Dark brown sugar: Using dark instead of light brown sugar produces a robustly flavored and deeply golden brown cookie. You can use light brown sugar, your cookies will just be a little lighter in color and more mild in flavor. Alternatively, add 1 teaspoon of mild molasses in with the light brown sugar to mimic the flavor and moisture content of dark brown sugar.
Milk: Since the act of browning butter removes all the excess water from the butter, it’s important to add a little bit of liquid back lest you end up with a greasy cookie. Milk does just that. Doesn’t matter if it’s skim or whole or heavy cream or even almond milk, it all works just fine.
Cornstarch: A bit of cornstarch reduces the protein content of the flour, making for a more tender cookie.
Instant espresso powder: I promise you can’t actually taste the espresso in the final cookie, but it does deepen the brown butter and chocolate flavors (think of it like a super salt in this case). Note the recipe calls for instant espresso powder, which is not the same as espresso-ground beans (which would make the cookies gritty). Instant coffee powder would be the closest replacement. You can omit this if you like, but don’t knock it until you’ve tried it!
Chocolate Chips: I used a mix of chips here, some semisweet (50-60%) chips and some dark (72% chips). I personally didn’t like how milk chocolate chips tasted when I included them in the mix, but use whatever chips or chopped chocolate you like. Using chopped chocolate or chocolate coverture instead of chips will lead to more melty puddles and slightly more spread than chips (which usually hold their shape).
Brown Butter Chocolate Chip Cookies
Prep Time: 30 minutes
Cook Time: 16 minutes
2 hours
Total Time: 3 hours
These cookies are extra large, extra gooey-in-the-middle, with an extra toasty, extra brown buttery flavor and a texture I can only describe as lush. This small batch recipe makes 6 extra-large cookies (equivalent to 12 normal sized ones).
To brown butter, combine butter and dry milk powder in a small saucepan over medium heat, until butter melts and starts to simmer and sputter (it will foam up quite a bit). Continue to cook, stirring occasionally, until the sputtering ceases and the butter solids on the bottom start to turn golden brown. Remove from heat and immediately pour into a heat-proof mixing bowl, scraping all the browned bits from the pan, and set aside to cool slightly (below 100 degrees F).
Add brown sugar and sugar to the mixing bowl with the lukewarm butter and stir until evenly moistened.
Add egg and egg yolk and mix well with a whisk or spatula until smooth and emulsified. Mix in vanilla and milk.
In a separate bowl, whisk together flour, baking soda, salt and espresso powder until evenly incorporated. Add to the wet ingredients and gently mix just nearly incorporated, with just a few streaks of dry flour remaining. Fold in chocolate chips until evenly distributed.
At this point the dough will be very soft. I recommend chilling for 15 minutes first to make it easier to handle, but I like to shape the dough while it's still fairly soft.
Scoop dough into 100 grams balls (a heaping large scoop or two medium scoops) and roll into a smooth ball. Split ball into two balls, one slightly smaller then the other, then stack it on top of the other one to form a snowman. I find this unique shape helps keep the cookies tall.
Optionally, press a few extra chocolate chips into the top of the dough (these will melt into perfect puddles on top of your cookie). Repeat with remaining dough to form 6 total cookies, then cover and refrigerate at least 2 hours or overnight.
Preheat oven to 350 degrees F. Line your baking sheets with parchment paper.
Arrange chilled cookie dough balls on prepared cookie sheet, leaving about 2 inches of of space between cookies. I baked 4 cookies per sheet, but you should be ok baking all 6 at once.
Bake for 15 to 16 minutes (slightly more or less depending on the size of your dough balls) or until tops are puffed, center is no longer raw-looking, and the bottom is slightly darkened to a golden brown.
Let cool on cookie sheet for 15 minutes, then transfer to a wire rack to cool completely. Cookies will keep in an airtight container for up to 3 days, refrigerated for up to 5, or in a zip-top bag in the freezer for up to 2 months.
All images and text ©
for Love & Olive Oil.
Let us know what you think! Leave a Review below or share a photo and tag me on Instagram with the hashtag #loveandoliveoil.
There may be affiliate links in this post. We are a participant in the Amazon Services LLC Associates Program, an affiliate advertising program designed to provide a means for us to earn fees by linking to Amazon.com and affiliated sites.