Homemade Peppermint Bark (Small Batch)
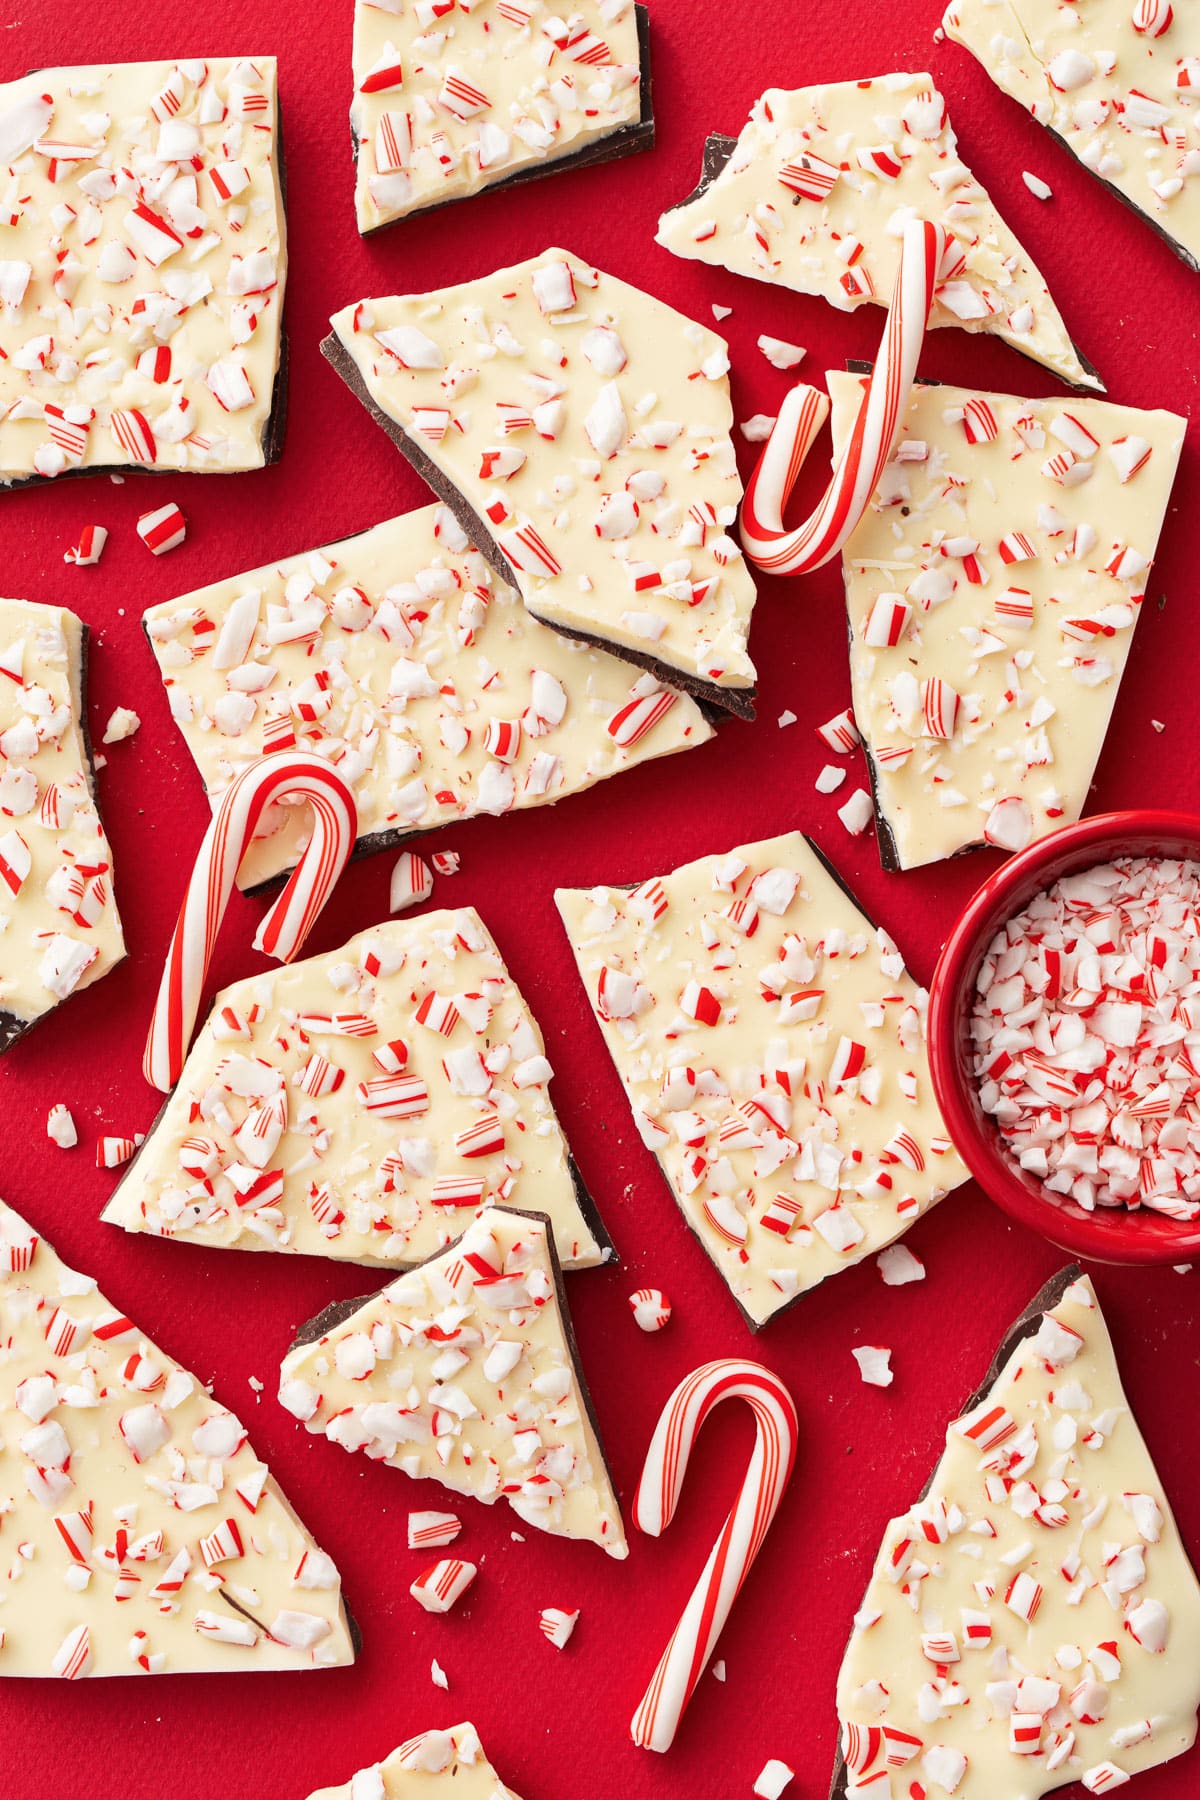
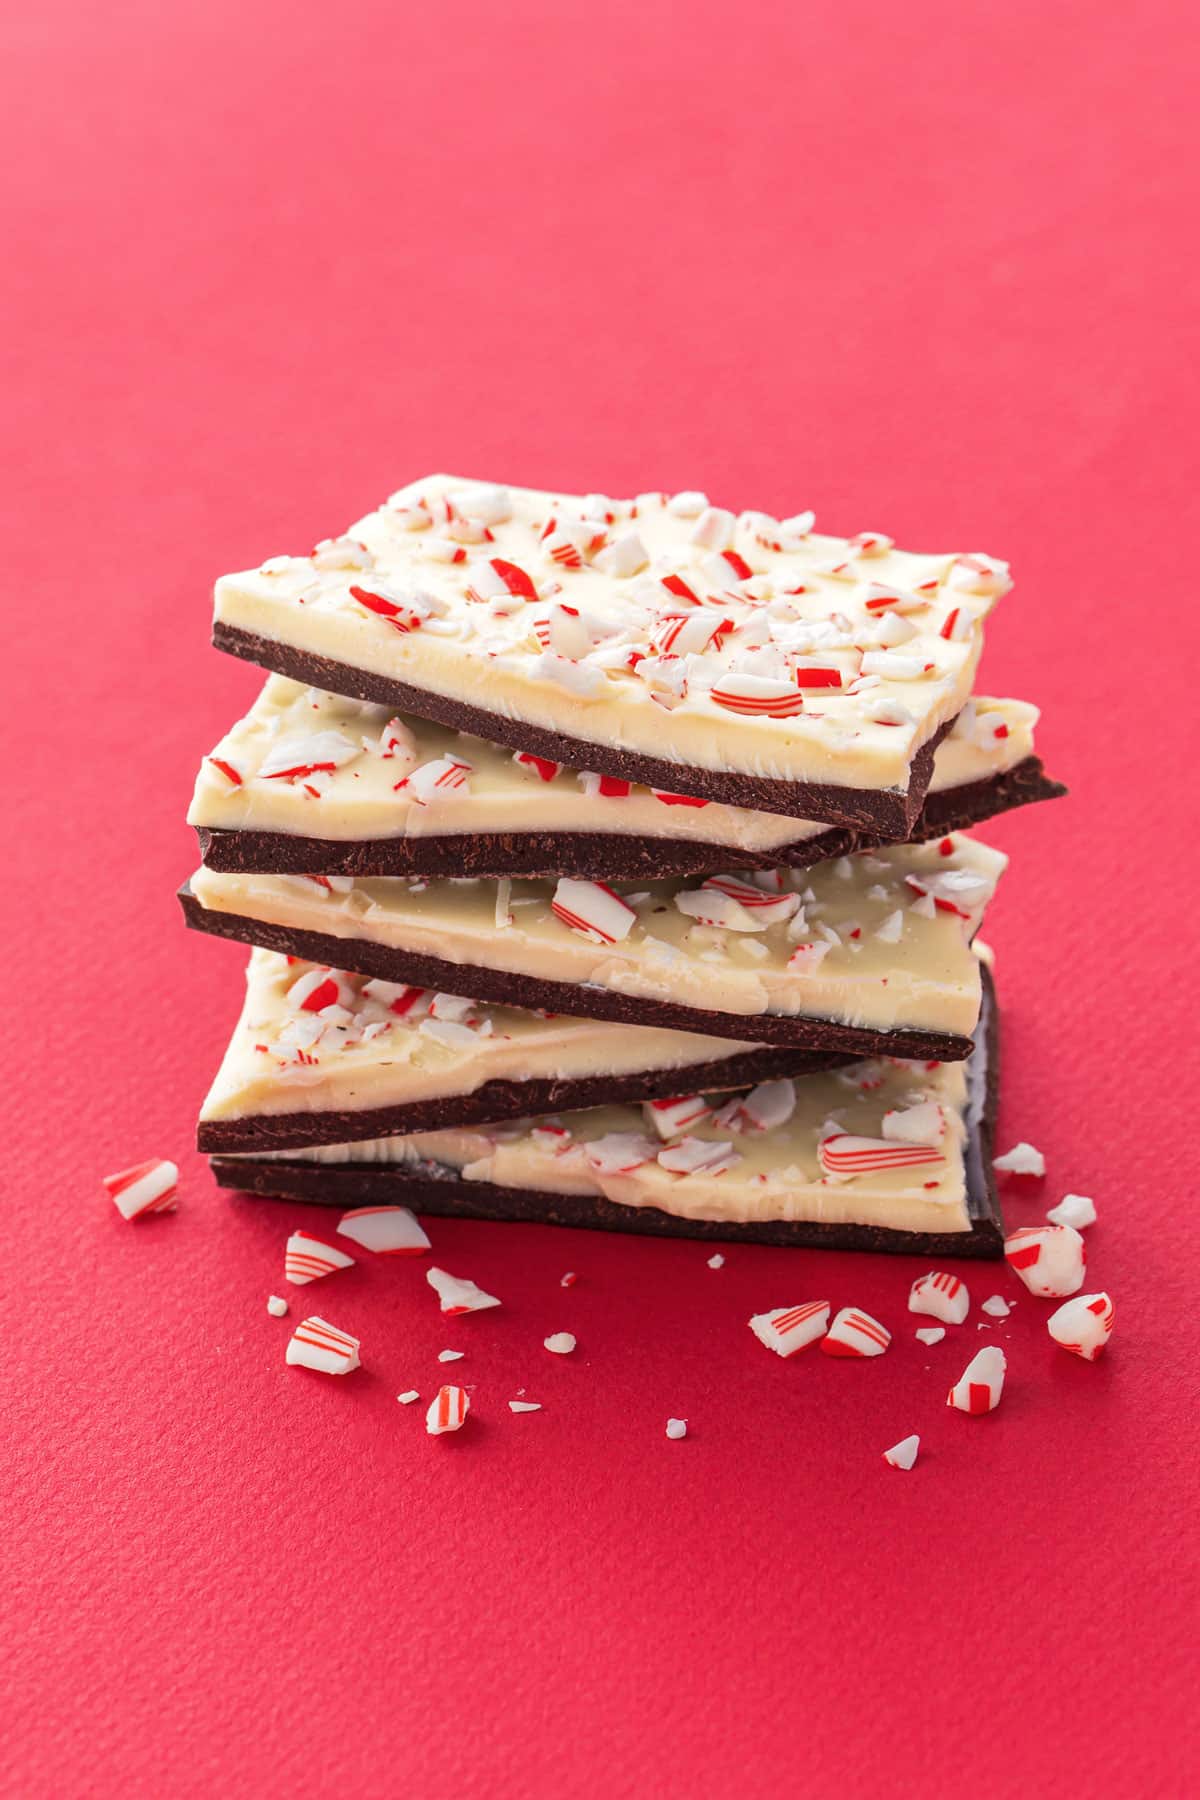
Peppermint bark is a satisfyingly simple holiday treat, with two gorgeous layers of dark and white chocolates and a flurry of candy cane pieces on top. Making your own from scratch is extra satisfying, with just a few ingredients...
 JimMin
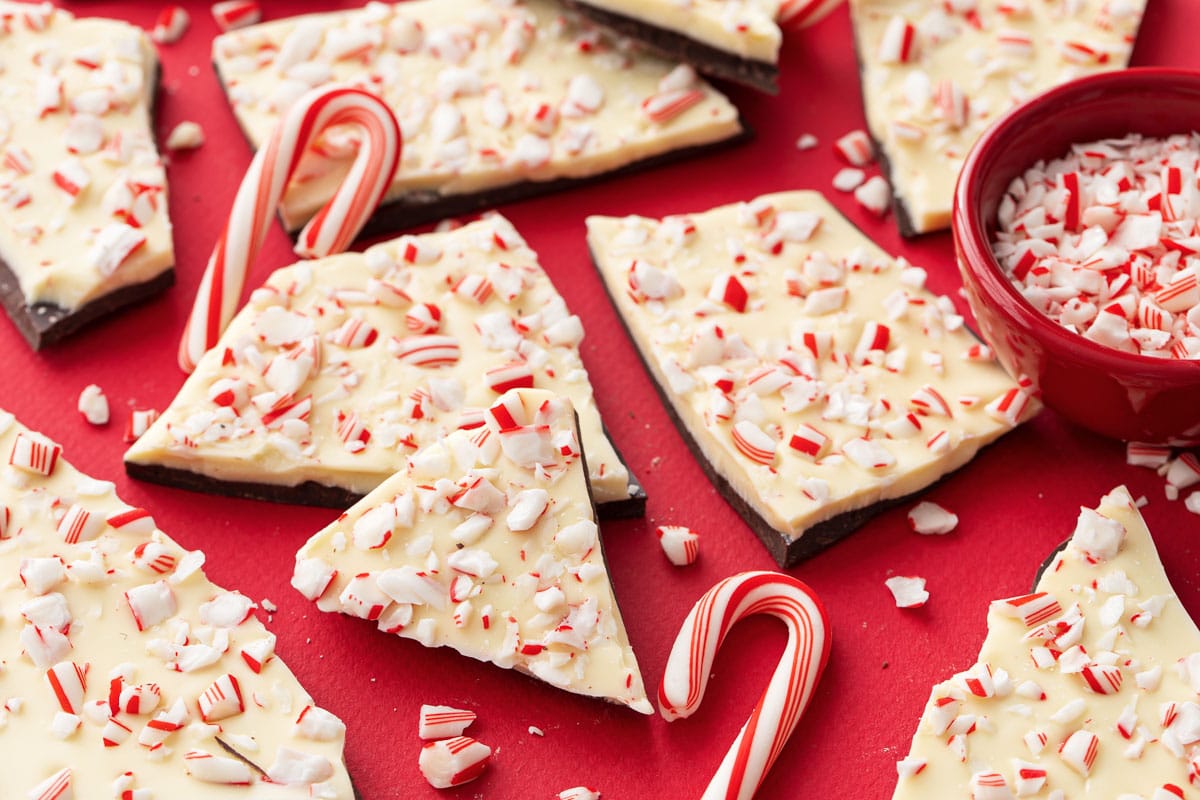
Peppermint bark is a satisfyingly simple holiday treat, with two gorgeous layers of dark and white chocolates and a flurry of candy cane pieces on top. Making your own from scratch is extra satisfying, with just a few ingredients and less than an hour of your time. This is a small batch recipe, requiring less than 12 ounces of chocolate in total to make an 8-inch square piece of bark, but it can easily be scaled up as needed.
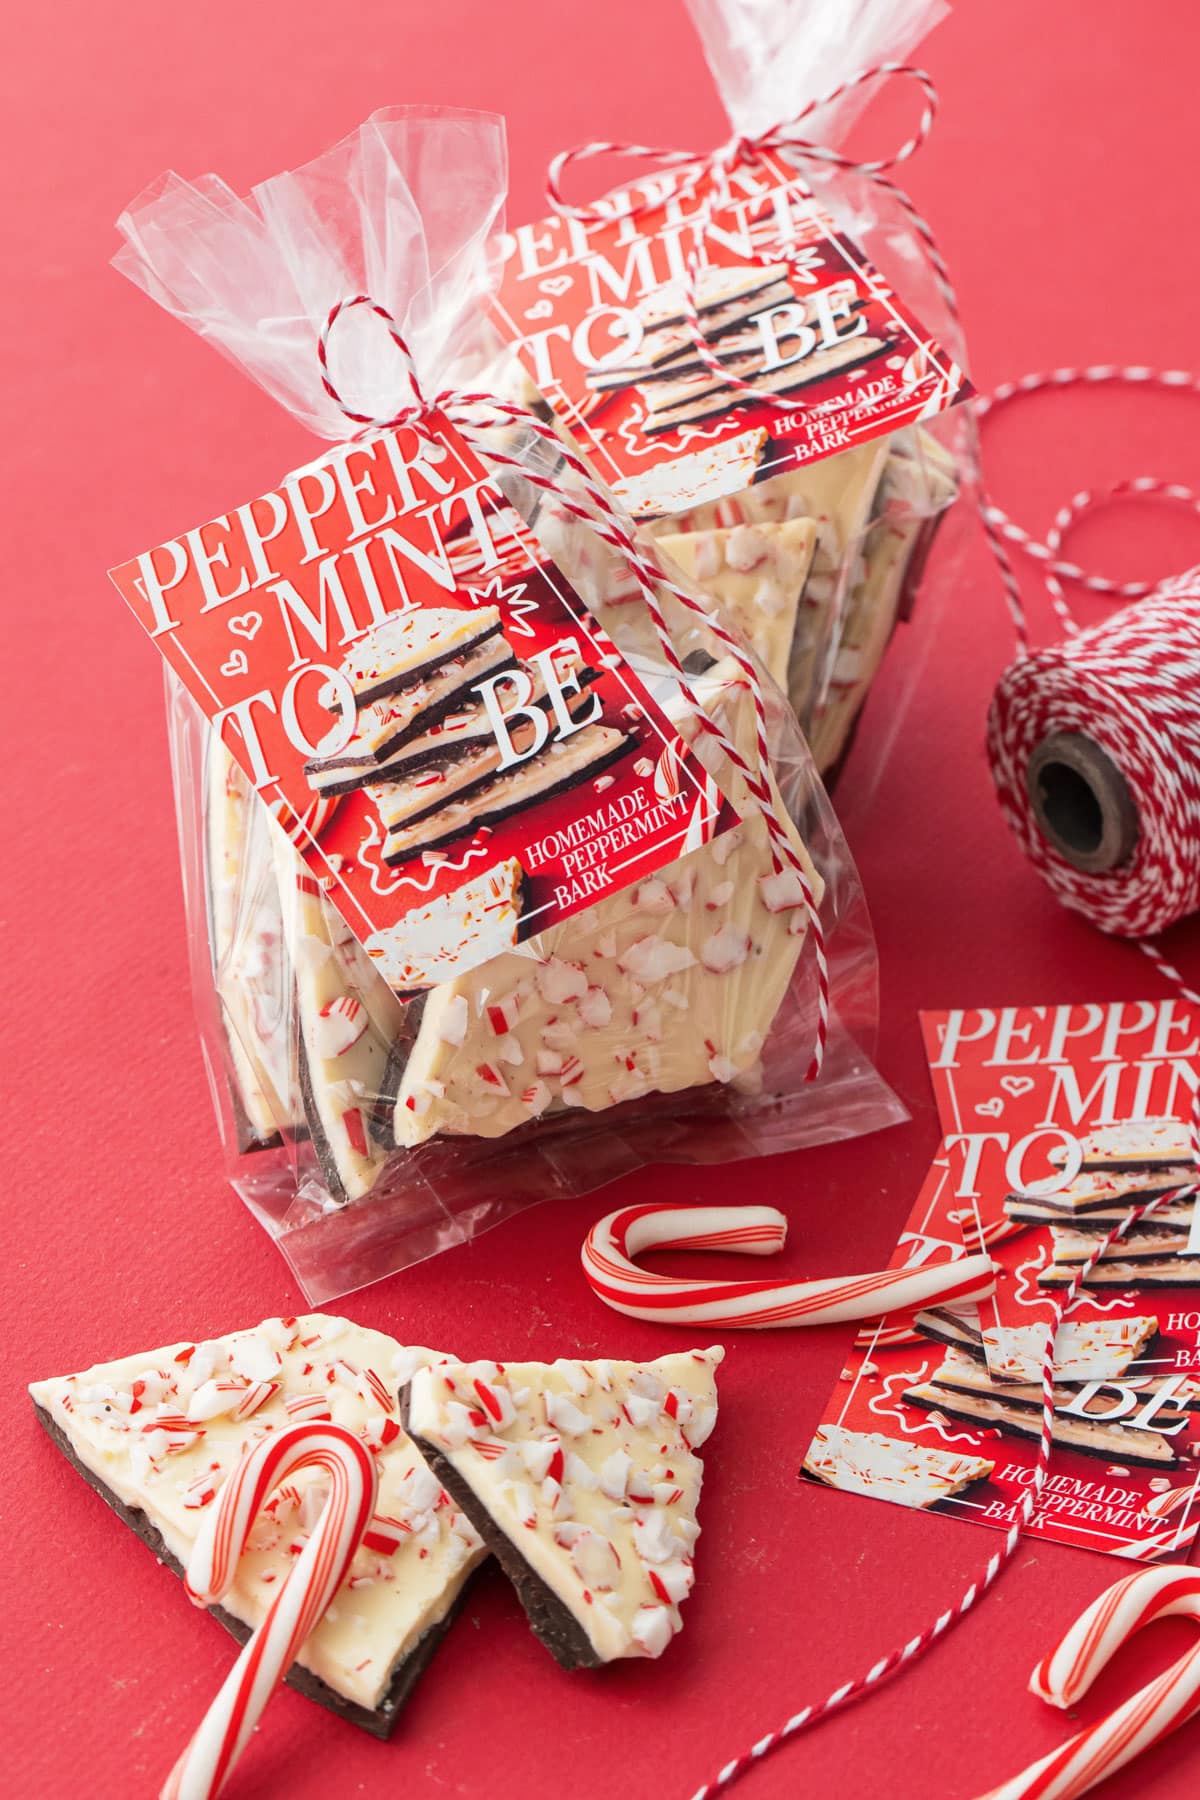
There’s a reason peppermint bark is a holiday staple: it’s oh so festive, almost universally popular, and a perfect long-keeping treat for gifting or cookie exchanges (it totally counts as a cookie, in my opinion). Tied with festive twine and gorgeous gift tags (scroll to the bottom to download the free printable!) it makes an amazing gift for friends, teachers, and anyone who could use a little extra holiday sweetness.
I’ll admit, I didn’t set out to share a basic peppermint bark recipe (or as Taylor would say, a plain a$$ peppermint bark). There are easily a million and one recipes already out there on the Internet, does the world really need another one?
But as I was testing my Chocolate Peppermint Bark Cookie recipe, I couldn’t find a store bought bark that wasn’t A: wildly expensive, or B: overly thick.
So I decided to make my own.
And since I was making my own peppermint bark from scratch anyway, I figured, why not kill two birds with one candy cane, and get a second post out of it? You could say it was peppermint to be! Granted, I didn’t plan on that second post turning into such a behemoth, a dissertation on peppermint bark if you will, but, alas, here we are.
(Don’t forget to scroll to the bottom of this (admittedly very long) post to download the free printable gift tags!)
The good news is I’ve packed this post full of information. Like, seriously packed. You can easily scroll on by all these words if you want, but the detailed information in this post will help you succeed and make the best bark that’s ever been barked.
For intermediate bakers looking to up their holiday treat game, there’s information here on tempering chocolate, which is what gives your chocolate bark that snappy, shiny finish. Most home-bakers ignore this step completely (in fact most easy peppermint bark recipes out there don’t even mention it), but I know that you—a detail-oriented, ambitious baker, who some might call a perfectionist—are ready to take your chocolate bark to the next level. I know you can do it!
And even if you’re not a huge fan of peppermint, you can use this post as a foundation chocolate bark recipe and process, which you can then adapt any way you please, with whatever flavorings and toppings your chocolate-covered heart desires.
Looking for more bark-inspiration? Check out my matcha white chocolate crunch bark, chocolate chip cookie bark, and internet famous chocolate peanut butter bark.
Psst! Scroll to the bottom of this post to download these darling printable gift tags!
Choosing your chocolate.
Peppermint bark is just chocolate, melted and reformed into a different shape. In the case of peppermint bark, with layers of dark chocolate and white chocolate with just a hint of peppermint flavor added. So obviously, the quality of the chocolate you use is important. In short, the better the chocolate, the better your bark will be.
Walk away from the baking aisle for this one, folks. Seriously. Instead, head a few aisles over and check out the chocolate bar selection, and choose your white and dark chocolates from there.
Why not baking chocolate? Baking chips are designed NOT to melt, made with additives and emulsifiers so they keep their shape when baked in cookies. Which makes sense when you think of a chocolate chip cookie, even hot out of the oven the chips keep their shape when baked.
But for this recipe, we want our melted chocolate smooth and fluid. And we also want chocolate that’s good enough to eat on its own. Which means getting eating chocolate, not baking chocolate. For the dark chocolate layer, look for a simple dark chocolate bar (no mix-ins) around 55-75% cacao. When it comes to white chocolate, look for cocoa butter as one of the first ingredients.
Or, if you have access to a pastry supply shop (locally or online), pastry chefs use what is called coverture chocolate for their chocolate creations. It is high quality, and formulated with high fluidity, which means it’s going to melt real nice (insert uncle Eddie gif here). It also typically comes in feves, disks, or callets, which negates the need to chop the chocolate before you start (there are few tasks I hate more than chopping chocolate). I used a mix of Callebaut, Valrhona, and Republica del Cacao chocolates here, all of which are great options.
If you insist on using a candy coating-like product (which does eliminate the need for tempering, I’ll give you that) something like Ghirardelli melting wafers are probably your best bet. Personally I’m not a fan of the fake, plasticky flavor these kinds of products often have.
Whatever you choose to use, just don’t mix chocolate types. For example, don’t use a high quality dark chocolate with a white candy coating, as your layers won’t meld together properly and will most definitely separate when you go to break it into pieces.
Control your temper.
Tempering is what gives chocolate that shiny, snappy finish—it’s essentially controlled crystallization. Untempered chocolate will be dull, bendy not snappy, and will very easily melt in your hands (so it needs to be refrigerated).
While your peppermint bark will taste just fine with untempered chocolate, proper tempering will take your homemade bark from ordinary to this-looks-professional territory. It is also stable at room temperature (so it’s great for gifting and shipping), and won’t melt all over your hands either.
That being said, I’m not a chocolate expert by any means. I sort of wing it much of the time using a rough seeding method that works for me maybe 60% of the time.
This year I made the effort to a be a bit more precise about it, using the same seeding method but paying attention to temperature a bit more closely. This chart here is a great reference if you’re wanting to temper chocolate yourself using the seed method.
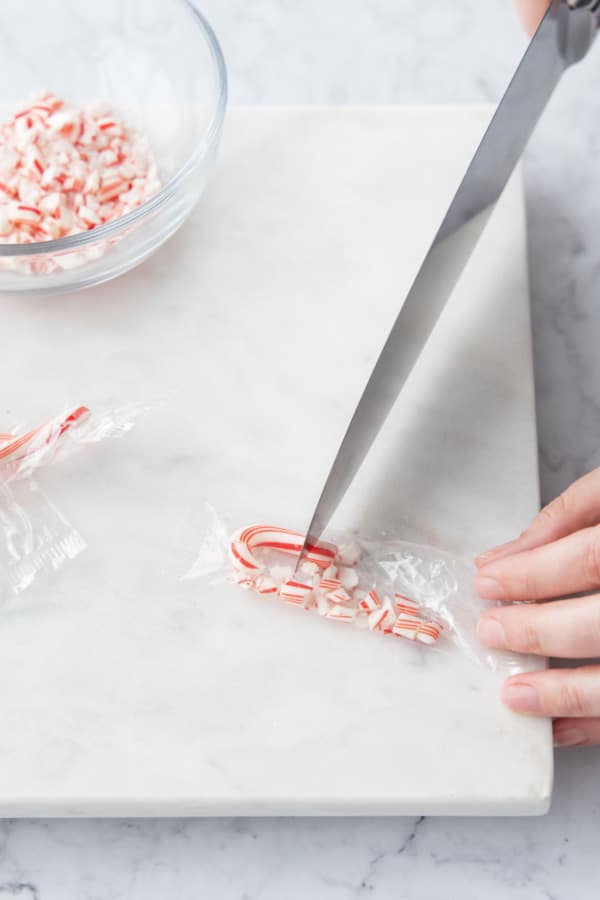 Break up candy canes by using the dull side of a knife to break into small pieces without pulverizing. Keep them in the wrappers for less mess!
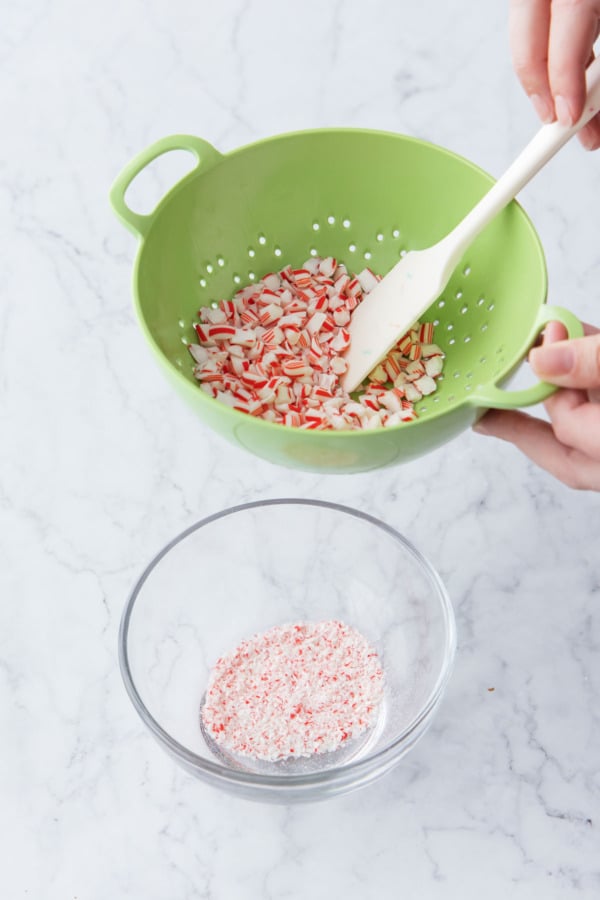 Optionally, sift through a berry bowl to separate out the larger pieces for a more aesthetic look.
 For this recipe I used a double boiler to melt my dark chocolate, and a chocolate melting pot for my white chocolate, so the dark chocolate is done about 5 minutes before the white.
 A double boiler is a great way to gently melt chocolate without overheating.
 At the same time, gently melt about 3/4 of the white chocolate; I used a chocolate pot, but a second double boiler or short/low bursts in the microwave works too.
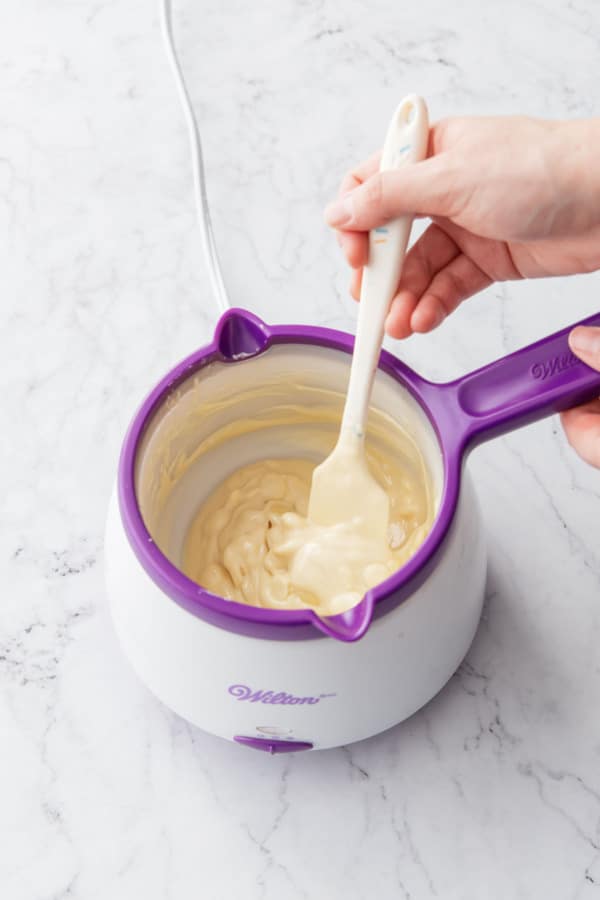 Gently melt the white chocolate until smooth and fully melted; it should not exceed 113ºF.
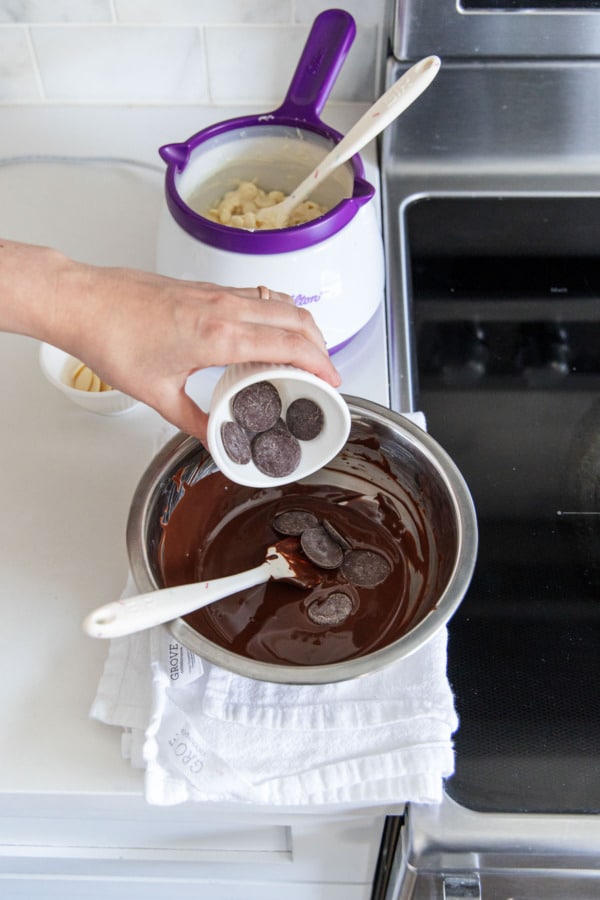 When the dark chocolate is fully melted, remove from heat and add remaining 1/4 of chocolate (this is your ‘seed’ chocolate) to start cooling it down to 80ºF and reforming the crystal structure.
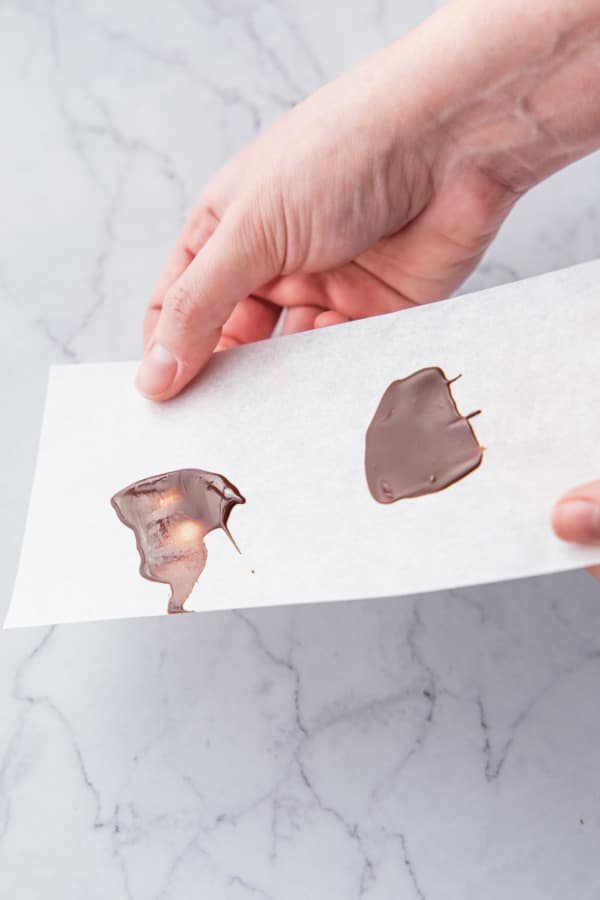 Properly tempered chocolate (right) sets very quickly with a snappy finish, while untempered chocolate (left) is still partially liquid after 5 minutes.
 Pour tempered dark chocolate into a parchment-lined baking pan (you can also do this free-form on a quarter sheet pan, just spread it out into an even layer about 8×8 in size).
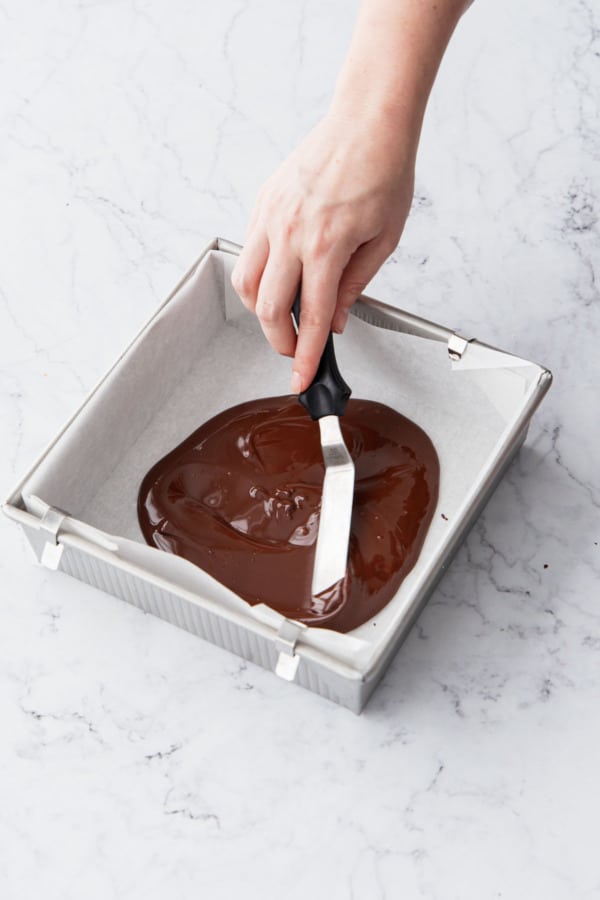 Use an offset spatula to spread the chocolate into an even layer, working quickly before it starts to set.
 When the white chocolate is fully melted, remove from heat and add remaining 1/4 of chocolate to cool it down to 80ºF.
 Add 4-6 drops of peppermint flavoring oil to both the white and dark chocolates (more or less to taste).
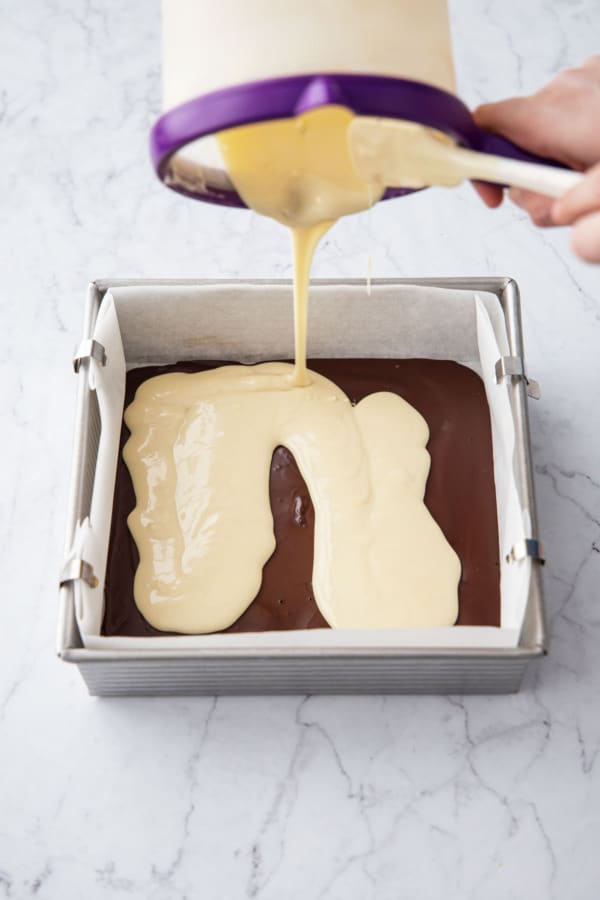 When dark chocolate is almost, but not fully, set, pour white chocolate on top and spread to the edges in an even layer.
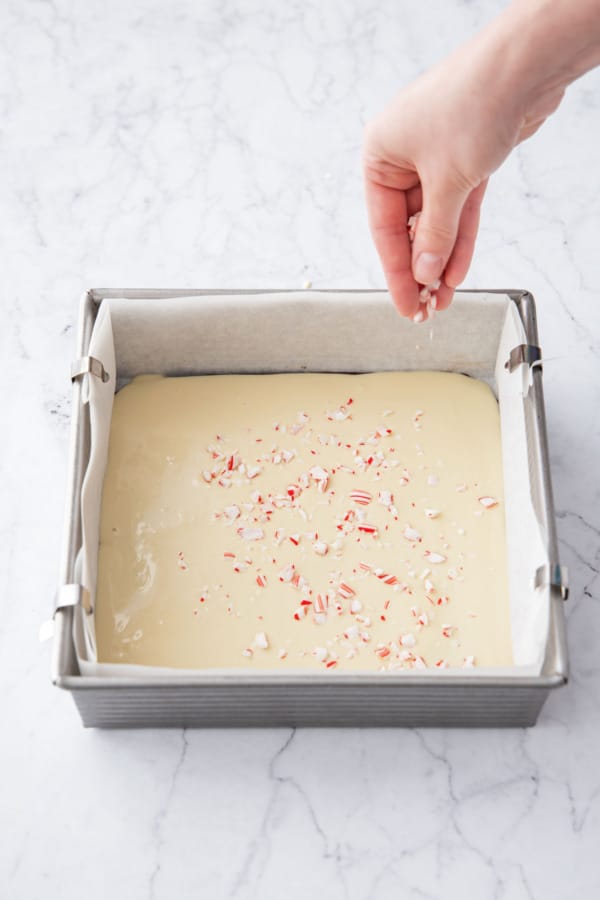 Working quickly, sprinkle crushed candy canes on top of still-soft white chocolate, then set aside at cool room temperature or refrigerate until chocolate is fully set before breaking into pieces.
To temper chocolate with the seed method, you start by melting about 3/4 of your chocolate or white chocolate. Save the remaining 1/4 as this will be your ‘seed’ chocolate. The first portion of chocolate can be old or untempered, but your seed chocolate should be well tempered chocolate—shiny and snappy—as we’ll be using that existing temper to jump start the crystalline structure for the rest of the chocolate.
You can melt your chocolate in a number of ways, but gentle heat is the key, as overheating is the second quickest way to ruin a batch of chocolate (the first being a stray water drop, ack!) Just take your time, don’t rush it, and take care not to let it get too hot!
A double boiler works great here, as long as you can safely keep water or steam droplets out of your chocolate. I bring the water to a bare simmer and then reduce the heat to very low; you do not need a full boil here.
You can also use the microwave, in multiple, short bursts at low power, and stirring well in between bursts. Then stop before the chocolate is completely melted: the residual heat will do the rest.
I prefer to use my little chocolate melting pot, which I bought years ago and has been worth every one of the 3700 pennies I paid for it (although for this recipe, since the chocolates need to be done around the same time, and I only have one pot, I ended up using the pot for the white chocolate [the medium heat setting is plenty!] and then a double boiler for the dark chocolate).
The initial melt breaks the existing crystal structure or temper; like a re-set for your chocolate, basically. This is the first and highest temperature on the chart (113-122°F/45-50°C for dark chocolate and 113ºF/45ºC for white chocolate), the chocolate should be fully melted at this point.
For the second step, remove from heat and add the remaining 1/4 of the chocolate. You want to gently stir until the temperature drops to the lowest point on the chart (about 80°F/27°C for all types of chocolate). The seed chocolate should be completely melted at this point, but if there are still some chunks left, you can fish those out (save them and use them in the initial melt next time).
I’ve actually started adding my seed chocolate in two additions, which I find helps increase my tempering success rate, giving me two chances to seed the proper crystal structure. The second addition probably won’t melt fully, so I usually have to fish out some of the unmelted pieces, but I had pretty good luck using this method in the 4 batches of peppermint bark I made for this post.
Test your temper by spreading a thin layer onto a piece of parchment. Set it aside for a few minutes and it should start to harden very quickly, forming a shiny matte finish. And when you bend the parchment, it should either peel off easily or break; if it bends, or still seems soft/unset, then it is not properly tempered.
After a successful test of the temper, if your chocolate is nice and fluid, you can work with it right away. If it’s a too bit thick, you can heat it up again ever so slightly, just to the ideal working temperature (the third point on the chart). For white chocolate that is much lower, 83°F/28ºC, while dark chocolate can be brought up to 88°F/31°C (milk chocolate falls somewhere in the middle). I was able to rewarm my chocolate by setting the bowl back on the pot of warm water off the heat (so the water is still warm but not simmering anymore). This quickly remelted the bit of chocolate that had cooled and hardened at the bottom of the bowl.

Cocoa butter be good.
White chocolate, even good coverture chocolate, has a tendency to be very thick when melted. I’ve found that adding a few grams of cocoa butter makes a huge difference in the fluidity and workability of the white chocolate.
If you’re working with tempered cocoa butter (which will have a shiny finish and usually shaped in callets or discs rather than rough chunks) also save a few pieces for the seeding step, as it will also aid in tempering your white chocolate.
In lieu of cocoa butter, you can technically use a bit of vegetable oil, coconut oil, or unflavored shortening (just a teaspoon or so, you don’t need a lot). Just keep in mind that while this will thin out the white chocolate nicely, you’re not going to be able to get a very good temper as a result.
So if you’re going to spend the time and try to temper, it’s worth ordering some cocoa butter ahead of time. Look for food grade cocoa butter in wafer or drop form; the shiny, snappy appearance—as opposed to the rough chunks that look a bit like aged parmesan cheese—means the cocoa butter itself has been tempered, which is going to in turn help temper your white chocolate in addition to making it smoother and more fluid.
You can also try to find something called mycryo powder, which is crystalized cocoa butter in powdered form (so it melts in instantly and fully, no chunks to fish out later). I’ve never been able to find it in less than commercial quantities though.
Water vs oil-based extract
Typical peppermint extract is water and/or alcohol-based. If you’ve ever ruined a batch of chocolate when even the tiniest drop of water gets into it, you know why that’s not a great idea. Most peppermint bark recipes out there call for regular peppermint extract, and it’s usually such a small quantity you might be ok, but seeing as how chocolate is so temperamental (pun intended), I like to eliminate any possible variables for failure, and that includes the use of water-based extracts.
Instead, an oil-soluble peppermint extract or peppermint flavoring oil is going to give you the same intense candy cane flavor without the risk seizing.
I used this oil-soluble extract, or LorAnn is another brand I’ve used (and you can usually find it at Michaels).
Note oil-based peppermint flavoring is NOT the same thing as peppermint essential oil, please do not use essential oil in this recipe. You must use a food-grade product for this recipe.

Batch, please.
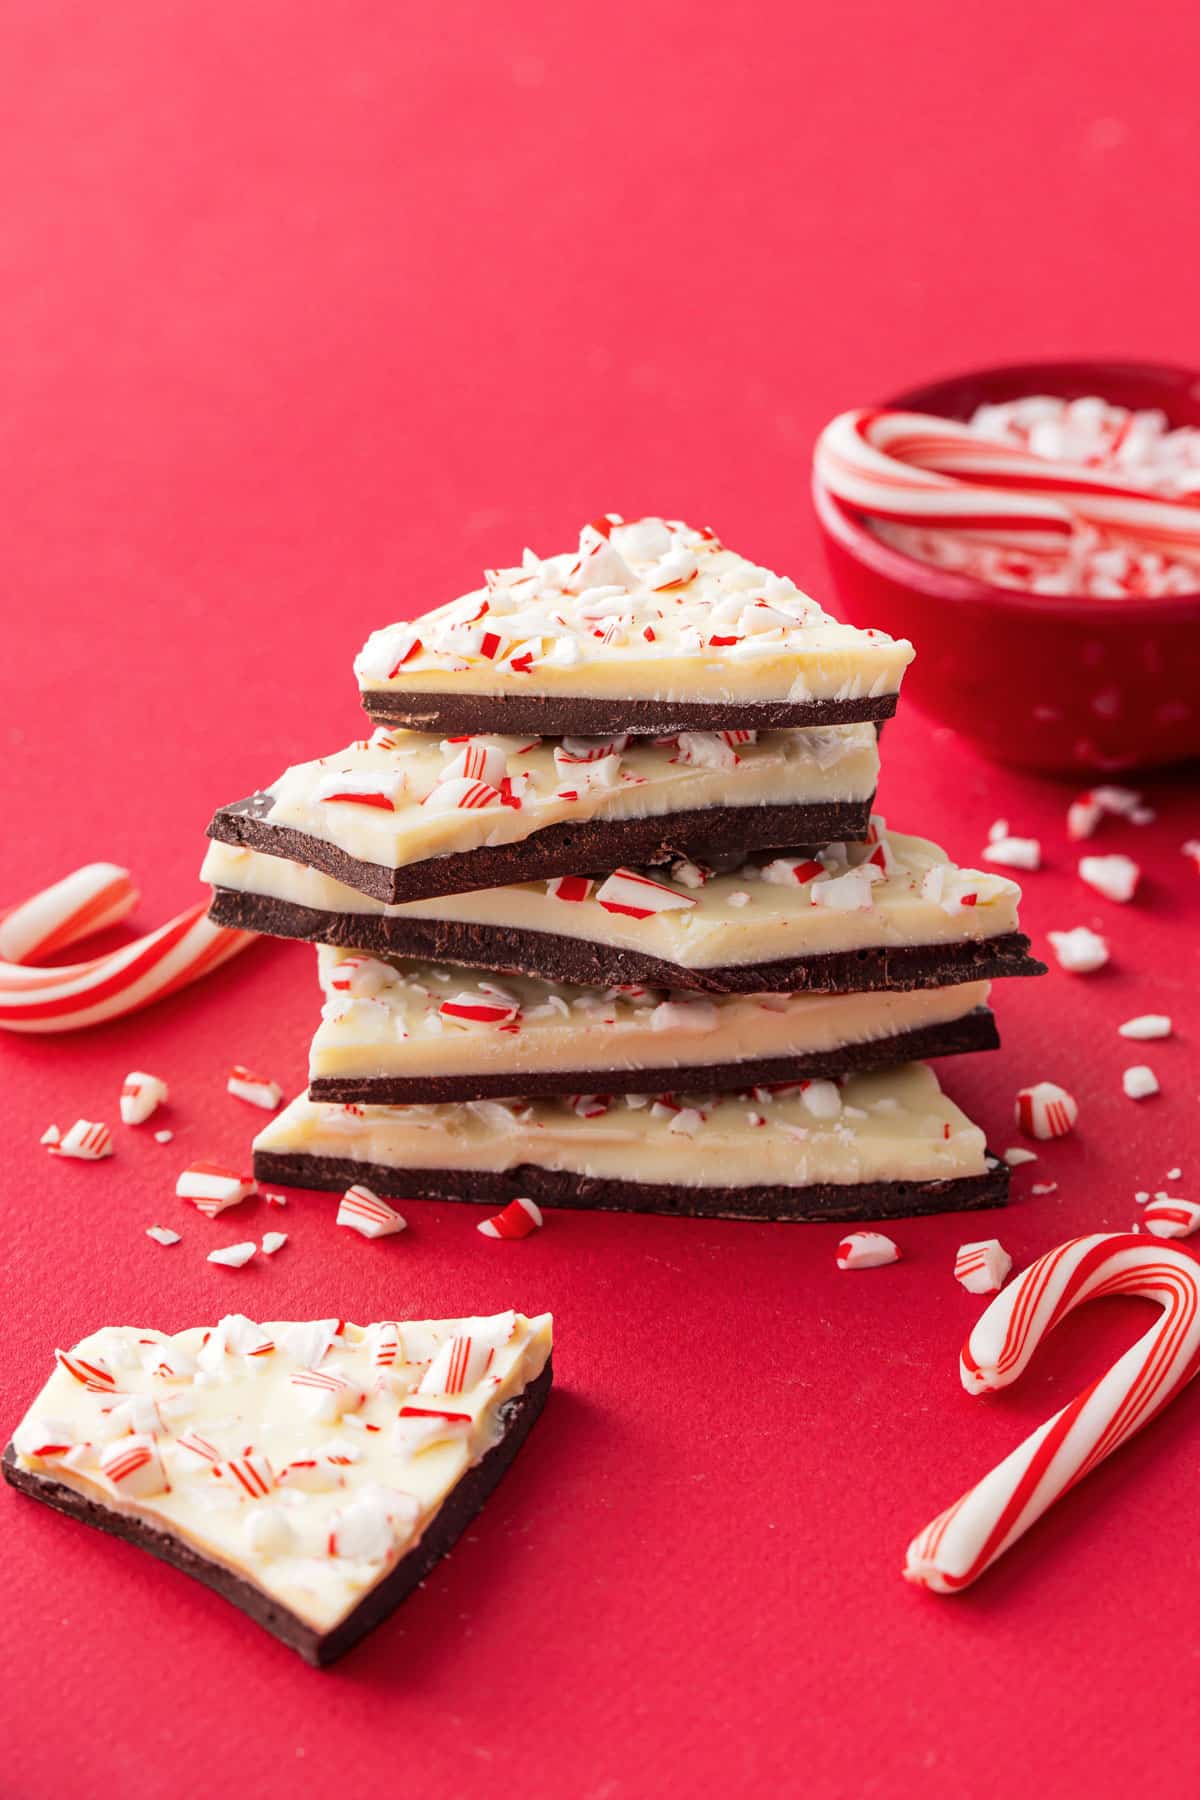
This is a small batch recipe, making one 8×8 square piece of bark (meaning you need less than 12 ounces of chocolate in total, and just 12 mini candy canes, to make it!) This will give you 2 or 3 treat bags full if you’re planning to gift it.
While it is written as a small batch recipe, it is very easy to scale it up as large as needed:
Double the recipe for a 13×9 inch pan or quarter sheet pan worth. Quadruple (4x) the recipe for a half sheet pan worth of bark.All the instructions remain the same for larger batches, though estimated times will increase slightly the larger the batch of chocolate you’re trying to temper.
All bark, lots of bites.
A few more tips for bark-making that didn’t really fit anywhere else in this post:
I prefer larger pieces of candy cane for visual effect. So rather than crushing the candy canes, I use the dull backside of a large knife to gently tap the candy canes (still in their wrappers!) This breaks up the candy cane into larger pieces without pulverizing it to dust. I also sift the candy cane pieces through a berry bowl to remove the smallest bits, leaving just the nicer bigger chunks for sprinkling on top (that said, you can also mix the dust into the white chocolate layer for an extra pepperminty twist). You want the first layer of dark chocolate to be almost, but not fully, set when you add the second layer. If the first layer is completely set you’ll likely notice your layers separate when you go to slice. if you find your first layer is already set, you can hit it quickly with a heat gun or hair dryer, just to soften the surface and let that second layer of white chocolate really stick. I like rough broken pieces of bark, so I break up the bark once it’s fully set rather than cutting it. But if you prefer neatly cut slices, try scoring the top layer of white chocolate while it’s still soft. That will let you easily break the bark into neat pieces once it’s fully set. Properly tempered, peppermint bark is perfectly fine at cool room temperature for up to 2 weeks. I store in an airtight container with parchment in between layers. If the chocolate is not tempered, I recommend keeping it refrigerated.
Homemade Peppermint Bark
Cook Time: 20 minutes
Total Time: 1 hour
You only need a few ingredients to make your own homemade peppermint bark for the holidays. This is a small batch recipe, requiring less than 12 ounces of chocolate in total to make an 8-inch square piece of bark, but it can easily be scaled up as needed.
Prepare an 8-by-8-inch square baking pan by lining with parchment. You can also use a sheet pan for a more freeform shape.
Gently crush candy canes, either coarse or fine depending on your preference. I like to do this in the plastic wrappers (it's neater that way), using the blunt back edge of a knife to gently tap and break up the candy cane into small pieces without crushing or pulverizing it. You can also sift out the larger pieces of candy cane; set aside the 'dust' leftover for another purpose.
Next it's time to melt and temper the chocolates. Ideally, the white chocolate will be ready about 5-10 minutes after the dark chocolate, so plan your setup accordingly. It helps to have an extra set of hands to stir and keep an eye on temperatures.
In a microwave, double boiler, or chocolate melter, gently melt 3/4 of dark chocolate. Use very gentle heat here, you don't want the chocolate to overheat or it will seize up; it should not exceed 120ºF/50ºC. Once it is fully melted, remove from heat and add remaining chocolate. This 'seed' method will help the chocolate form a nice snappy finish. Continue to gently stir until fully melted and temperature has lowered to about 80ºF/27ºC. Add 4-5 drops of peppermint flavoring (or to taste). You can rewarm the chocolate slightly if needed to be workable, but no higher than 86ºF/30ºC or so.
Pour melted chocolate into prepared pan; gently spread into an even layer. Firmly tap the pan a few times on the countertop to get rid of any air bubbles. Set aside at cool room temperature until almost (but not completely) set, which should only take about 5 minutes if properly tempered. If your chocolate has not been properly tempered, you may need to refrigerate for a few minutes it to get it to set.
Melt white chocolate in the same way you did the dark chocolate, by gently melting about 3/4 of it over very very low heat (it should not exceed 113ºF/45ºC, white chocolate is much more sensitive than dark). You can add about 15g of cocoa butter while it is melting to make the white chocolate more fluid. Remove from heat and stir in the remaining white chocolate, stirring until fully melted and cooled to about 80ºF/27ºC. Add 4-5 drops of peppermint flavoring (or to taste). You can rewarm the chocolate slightly if needed to be workable, but no higher than 82ºF/28ºC or so.
If your dark chocolate layer is completely set at this point, you can rewarm it slightly by hitting it with a heat gun or hair dryer, or putting it in a barely warm oven for just a few seconds until the top just starts to get shiny (be very careful not to warm it too much otherwise it will lose its temper).
Spread white chocolate on top of dark chocolate layer, spreading to the edges in an even layer. Sprinkle with crushed candy canes.
Let sit uncovered at cool room temperature until set, about 1 to 2 hours. Break or cut into serving size pieces. Store at room temperature, or if your chocolate isn't fully tempered, keep refrigerated to keep the bark firm.
All images and text ©
for Love & Olive Oil.
Let us know what you think! Leave a Review below or share a photo and tag me on Instagram with the hashtag #loveandoliveoil.
Free Printable Gift Tags
Peppermint bark is one of my favorite giftable treats for the holidays because it is sturdy, shelf stable at cool room temperature, and keeps well for weeks (unlike cookies which tend to dry out in a matter of days.) This makes peppermint bark a perfect treat to ship in sweet holiday care packages, bring to parties and cookie exchanges, and give out as gifts.
Package your homemade bark in clear cello treat bags, tied with red and white baking twine and gorgeous custom gift tags for the perfect finishing touch to let your recipients know exactly what they’re getting and who made it!

The free downloadable PDF includes two pages, one for the front of the tag and an optional back with space for you to fill in your name and your recipient’s, or you can leave the backs blank and write your own personalized message.
Print in full color onto sturdy white cardstock, cut out the individual tags, and punch a hole punch for the twine (the hole can go in the top corner like mine, or in the center; I prefer a smaller 1/8″ hole punch for this task).
Free PDF Download
Enter your email address below to instantly download a convenient PDF file, ready for printing!
There may be affiliate links in this post. We are a participant in the Amazon Services LLC Associates Program, an affiliate advertising program designed to provide a means for us to earn fees by linking to Amazon.com and affiliated sites.